Can I ask you a question?
What do you do after you hit the “Publish” button?
If you started a blog and it isn’t getting any traction, you probably aren’t doing the right things.
Let’s be real. You can’t just post to social media a few times and move on to the next post. That’s not going to cut it.
You can’t spend all your time writing new posts and then neglect those posts once they’re published.
In fact, you should spend only 20% of your time writing, and 80% getting people to read what you wrote.
But how, you ask?
This post will tell you 10 things you need to do after publishing your post.
It contains an after-publish task list you can use to take your blog from barren wasteland to popular tourist attraction. Follow these recommendations, and you’ll stand to 10X your results from every blog post you publish!
Ready?
Great, then let’s start.
Blog Checklist: After You Click Publish, Do These 10 Things
- Jumpstart Traffic with a Teaser Email
- Deploy a Never-Ending Social Media Campaign
- Persuade Influencers to Spread the Word
- Go Hunting for Juicy Backlinks
- Perform a 10-Minute Internal Link Audit
- Answer the Burning Questions on Quora
- Repurpose Your Post
- Turn Your Post into a Facebook Ad
- Dig Deep Into the Data
- Remind Yourself to Refresh Regularly
1. Jumpstart Traffic with a Teaser Email
Your first order of business is to get some immediate traffic to the blog post. The most obvious way to do that is by promoting the post to your own email list.
Now, many people like to include the entire blog post in their emails, but you shouldn’t do that.
Why?
Because that doesn’t get you any traffic! When your subscribers get your full post in their inbox, they don’t need to visit your blog to get the content. Plus, it also makes them less likely to share, comment or read other posts on your blog.
Instead, use a brief “teaser email” that entices your subscribers to click through to your blog and share the post with their friends. This gets the ball rolling so that even people outside of your email list can find your post.
Here’s an example:
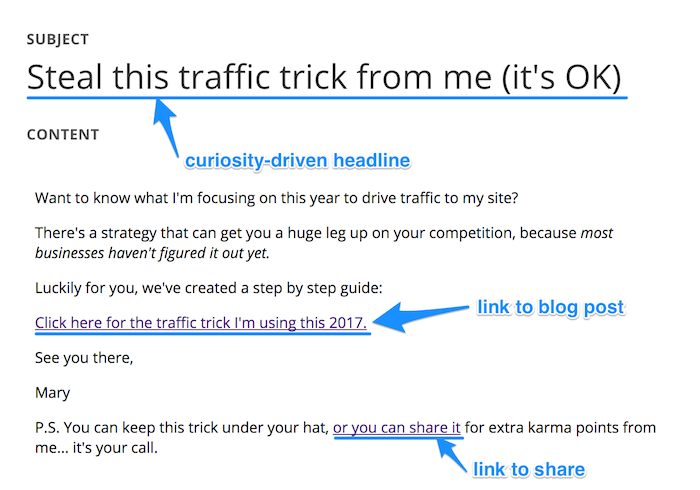
Without giving away too much, I linked to the blog post using power words in an enticing call-to-action. I’ve also included a P.S. that invites subscribers to share on social media, including an easy link to share the post on Twitter.
2. Deploy a Never-Ending Social Media Campaign
Average bloggers only share their posts on Twitter, Facebook, Growth Hackers, etc. once. Smart bloggers create “evergreen” social media campaigns.
An evergreen campaign is a series of social media updates that constantly recycle themselves. So instead of just sharing your post a few times and calling it a day, your post gets promoted over and over again, on autopilot.
You can set this up by using a tool called MeetEdgar. This tool allows you to create a library of social media updates and a queue that automatically fills itself using the updates in your library.
Here are some ideas for social media updates to add to your evergreen campaign:
- Share the headline, or a variation of the headline for your post
- Share a quote or excerpt from your post
- Share an infographic or image from your post
- Tag an influencer who you featured in the post
If you can’t afford the $49/month for MeetEdgar, then MissingLettr is a similar product (albeit with more limited features) for $27/month.
3. Persuade Influencers to Spread the Word
Reaching out to influencers is a great activity to focus on after publishing. One influencer sharing your post on social media can make the difference between a couple views versus several hundred, or even thousands!
So how do you find these influencers?
One way to find them is by using BuzzSumo. Just go to the Influencers tab, and search for the topic of your blog post. It will show you a list of the top influencers who share content related to that topic.
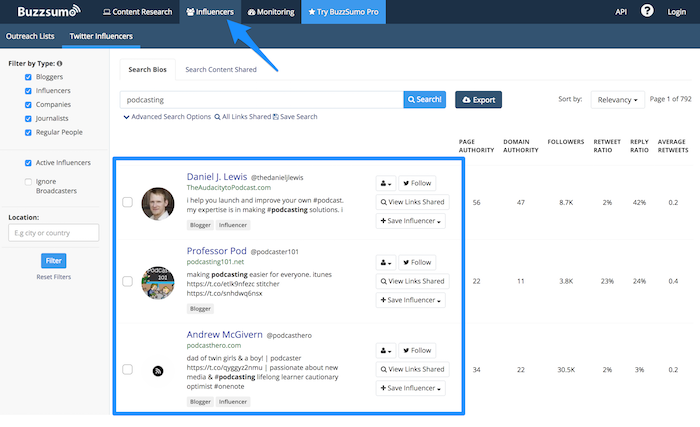
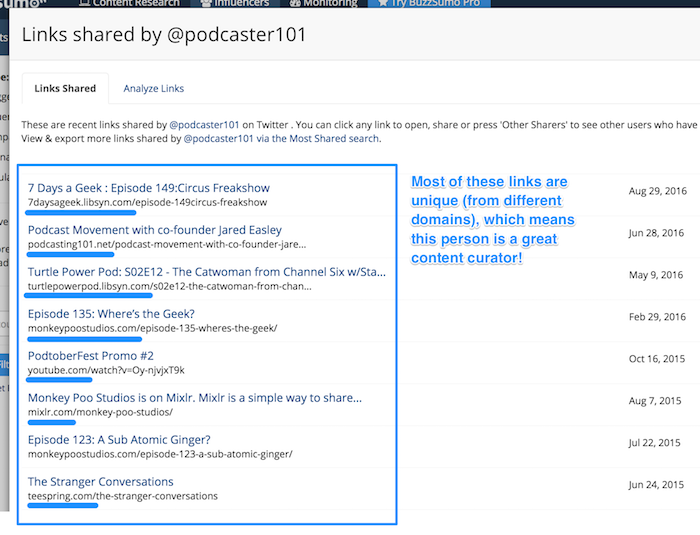
To see if they are a good influencer to approach, click on the “View Links Shared” button to the right of their name and description. This will show you a list of recent links they shared. Look at the URLs of the links to see whether they commonly share other people’s content.
I should note that Buzzsumo does cost $99/month. If you’re not already using it and that’s not something you can afford, use their 14-day free trial to search for several niche-related keywords and find as many influencers as you can. (Categorize them by topic so you know for which posts you should reach out to them.)
When your trial runs out, you can google your topic and find high-ranking blogs. Then, find the people behind them on social media and check whether they are good influencers to approach. It may take more time to find good influencers, but it gets the job done.
Once you’ve collected a solid list of influencers, let them know that you have a blog post that they might be interested to share with their audience on their blogging platforms. (You can either reach out to them via social media, or send them a cold email.)
To learn how to actually persuade influencers to share your post, check out Brian Dean’s guide on how to get influencers to promote your content for free.
4. Go Hunting for Juicy Backlinks
If you want to get as many eyeballs on your content as you can, you have to help it rise in Google’s ranks.
But you have to provide some hard evidence to show Google your post is worthy of their elusive page one — specifically, you’ll need to get backlinks from high-quality sources in your niche. This shows search engines that your post is also high-quality by association.
To find other blog owners who might want to link to you, do a series of Google searches on your topic. You are especially looking for list posts and resource posts that have lots of links to other blog posts like yours.
Examples would be posts like 21 Beginner-Friendly Tips for Landing Freelance Writing Jobs or Affiliate Marketing in 2020: FREE Guide for Beginners.
To find examples on your topic, Google phrases like:
- “[your topic] tips”
- “[your topic] ways”
- “[your topic] resources”
- “[your topic] links”
Make a list of blogs that you want to reach out to and then find the contact info of the people in charge. Send them an email explaining that you enjoyed reading their post and that you wrote one on a related topic. Tell them you’d love to know what they think. Then, if you get a positive response, ask whether they’d consider adding the line to their post, if they think their audience would be interested.
Not everyone will say yes, but you should shoot for a 10% success rate or higher (i.e. you should get one backlink for every ten bloggers you ask.)
5. Perform a 10-Minute Internal Link Audit
Speaking of links, that’s something you should take care off on your own blog as well.
Interlinking your blog posts with each other makes them easier for Google to index, helps you rank in search engines, and it keeps readers browsing your blog!
So set 10 minutes aside to do an internal link audit. Take a look at other posts you’ve written and see if you can add any links to them that point to your newly published post.

Make a game of it, and see how many internal links you can add in just 10 minutes!
6. Answer the Burning Questions on Quora
Another great way to promote your blog post is by answering questions on Quora.
Just search for your topic, and see what questions come up.
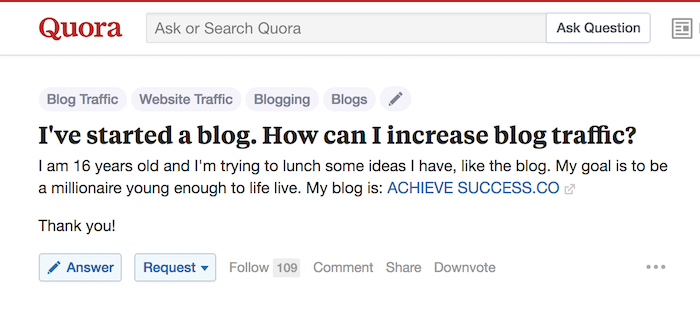
Then, compose a thoughtful answer (like this one by Ryan Robinson), and link to your related blog post.

The key with Quora is to make your answers as helpful and informative as possible. Don’t just drop your link and run … it won’t work.
Quora uses a voting process to display the best answers at the top. Make sure that you are providing value first, and that your answer is worthy of being featured as the top answer!
7. Repurpose Your Post
Don’t forget that content can take on many different forms other than written blog posts. Repurposing your posts by leveraging different types of content is a very smart (and efficient) way to attract new audiences!
For example, you could record yourself reading your blog post, and turn the recording into a podcast episode. User Experience designer Paul Boag does this for each of his blog posts (and he also embeds the recording at the top of the blog post itself, for visitors who would rather listen than read).
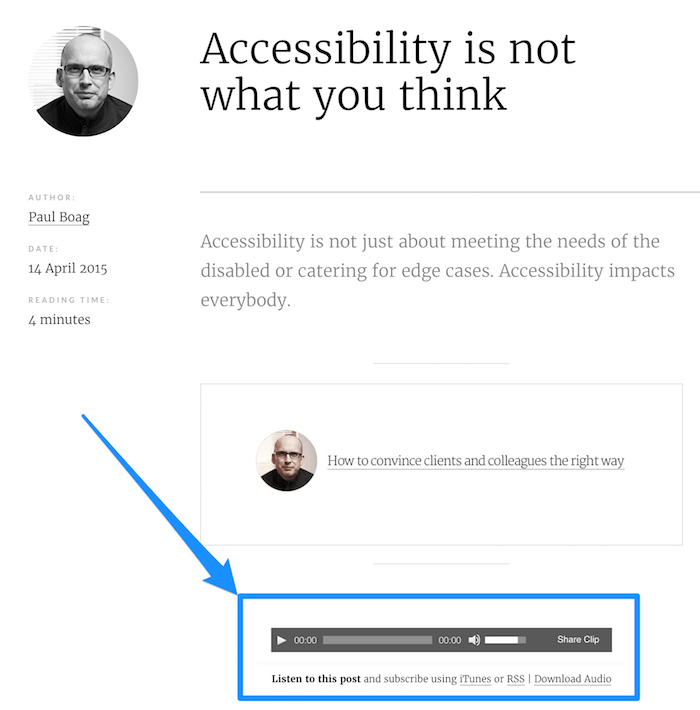
But that’s just one idea. You could also …
- Turn your post into a slide presentation and offer it as a webinar.
- Turn it into a video.
- Create a downloadable PDF version.
- Take multiple related posts and turn them into an ebook.
You have many options, so use them.
8. Turn Your Post into a Facebook Ad
Did you know that top blogs will actually turn their posts into Facebook ads to drive more traffic to them?
Well, Facebook ads aren’t just for large blogs with huge advertising budgets … you don’t need to spend more than a few bucks per day.
In fact, I used Facebook ads to grow my email list by 532 subscribers in just 43 days, and for the price of a cup of coffee!
The beauty of Facebook ads is that you can target specific groups of people with them. For instance, you could show your ad to people who like other Facebook pages in your niche. Or you could target people who have an interest in specific topics.
The opportunity that Facebook presents to advertise your blog would be foolish to ignore. The fact is, there are over 1.9 billion monthly users on Facebook. So chances are, your target audience is there! Why not send them to your best content?
9. Dig Deep Into the Data
This activity is one of the most overlooked, but also one of the most important. If you don’t analyze your post’s performance, how will you ever know what’s working and what’s not?
Set up a Google Analytics account to see whether your promotion strategies are working.
Look at the data a week after your post to see how well it did immediately after publication.

Did it get as much traffic to your post as you were expecting?
How long did visitors stick around to read your post, and did they convert to subscribers?
How much of your existing traffic is from social vs. referrals (people linking to your post) vs. direct channels (your teaser email)?
For example, if you have lots of direct but no social traffic, that could mean that you’re doing a great job with your teaser email, but it underperformed in the social arena.
Then, make sure you check the post’s data periodically to see how it’s doing traffic-wise. (More on that in a second.)
To learn more about how to use Google Analytics, check out this crash course.
10. Remind Yourself to Refresh Regularly
Did you know that “freshness” is an important factor that Google takes into account when deciding whether or not to display your post in the search results?
You should update your best-performing blog posts with new information on a regular basis. Your posts will continue to provide the best content for your readers, and you boost your chances of keeping your rank in the search engines.
The problem is, this is a task that is easily neglected.
So after you click publish, set a reminder for yourself to go check on your post in a year and see whether it warrants refreshment. (I recommend creating a single event for a number of posts, so you don’t drive your future self crazy with weekly reminders.)
Make sure you set the event to repeat every year and set the notification to “email.”
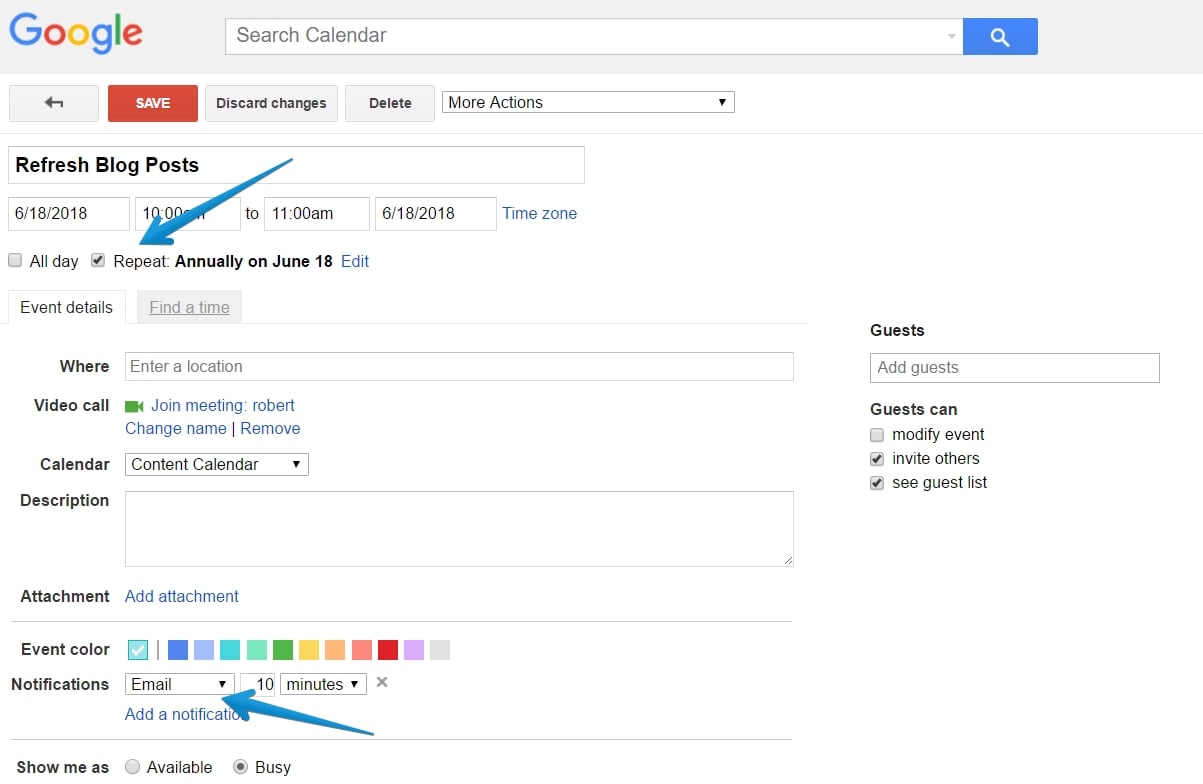
Then, when you get a reminder, first check how your post is performing. If it barely gets traffic, it’s not worth your time to refresh. (Though, if you think the post is worth giving a second chance, you could try targeting a new keyword and/or republishing it under a new headline.)
If it is performing well, see if you can refresh your post by:
- Adding new tips, examples or insights you’ve gained since publication
- Checking the comments for questions you could address in the post
- Revising outdated information
- Checking whether all the links still work
- Checking whether the resources or tools you recommend are still the best
- Removing or replacing methods you no longer support
- Adding or updating images, screenshots, graphs, etc.
Once you’ve made the improvements to your post, mark it as updated. You can either add (Updated) to the end of your headline, or add a message at the top of your post.
Give Every Post the Best Chance You Can
If you think your work is over as soon as you click “publish,” it’s time to think again.
Because what you do once your post is live is even more important than what you do before. Taking your foot off the gas can mean that all the effort you spent writing your post goes to waste.
So instead of writing post after post, spend some time getting people to read the ones you’ve already written. Try some of the above tasks on your older posts, and keep them in mind for your next ones.
Stop neglecting your posts after you publish them and get them the attention they deserve.
And before you know it, you’ll see your traffic soar and you start to make money from blogging.
The post 10 Things You Need to Do After You Publish Your Blog Post appeared first on Smart Blogger.
from
https://smartblogger.com/after-publish-blog-post/
No comments:
Post a Comment