Writing a bio is hard.
You have to knock ’em dead with two or three dazzling sentences that show you’re a likable, credible, and accomplished expert.
When readers read your bio, they must believe you’re the answer to their prayers — the superhero they’ve been waiting for, that will swoop in and solve that big problem they’ve been dealing with.
But your bio makes you sound more like a superdweeb than a superhero, and every time you land a guest post, only a trickle of readers ends up on your site.
“What about my brilliant post?” you want to yell at your computer. “Wasn’t that enough?”
No, it wasn’t, and that’s the point.
By the time people get to your bio they’ve read your post to the end (high five for that!). You’ve earned their attention. But unless you can convince them you have more to offer them, they’re gone.
So you need to make every word count.
Luckily, I can show you a simple three-step process to do exactly that. But first, let’s look at some common bio blunders and how to avoid them.
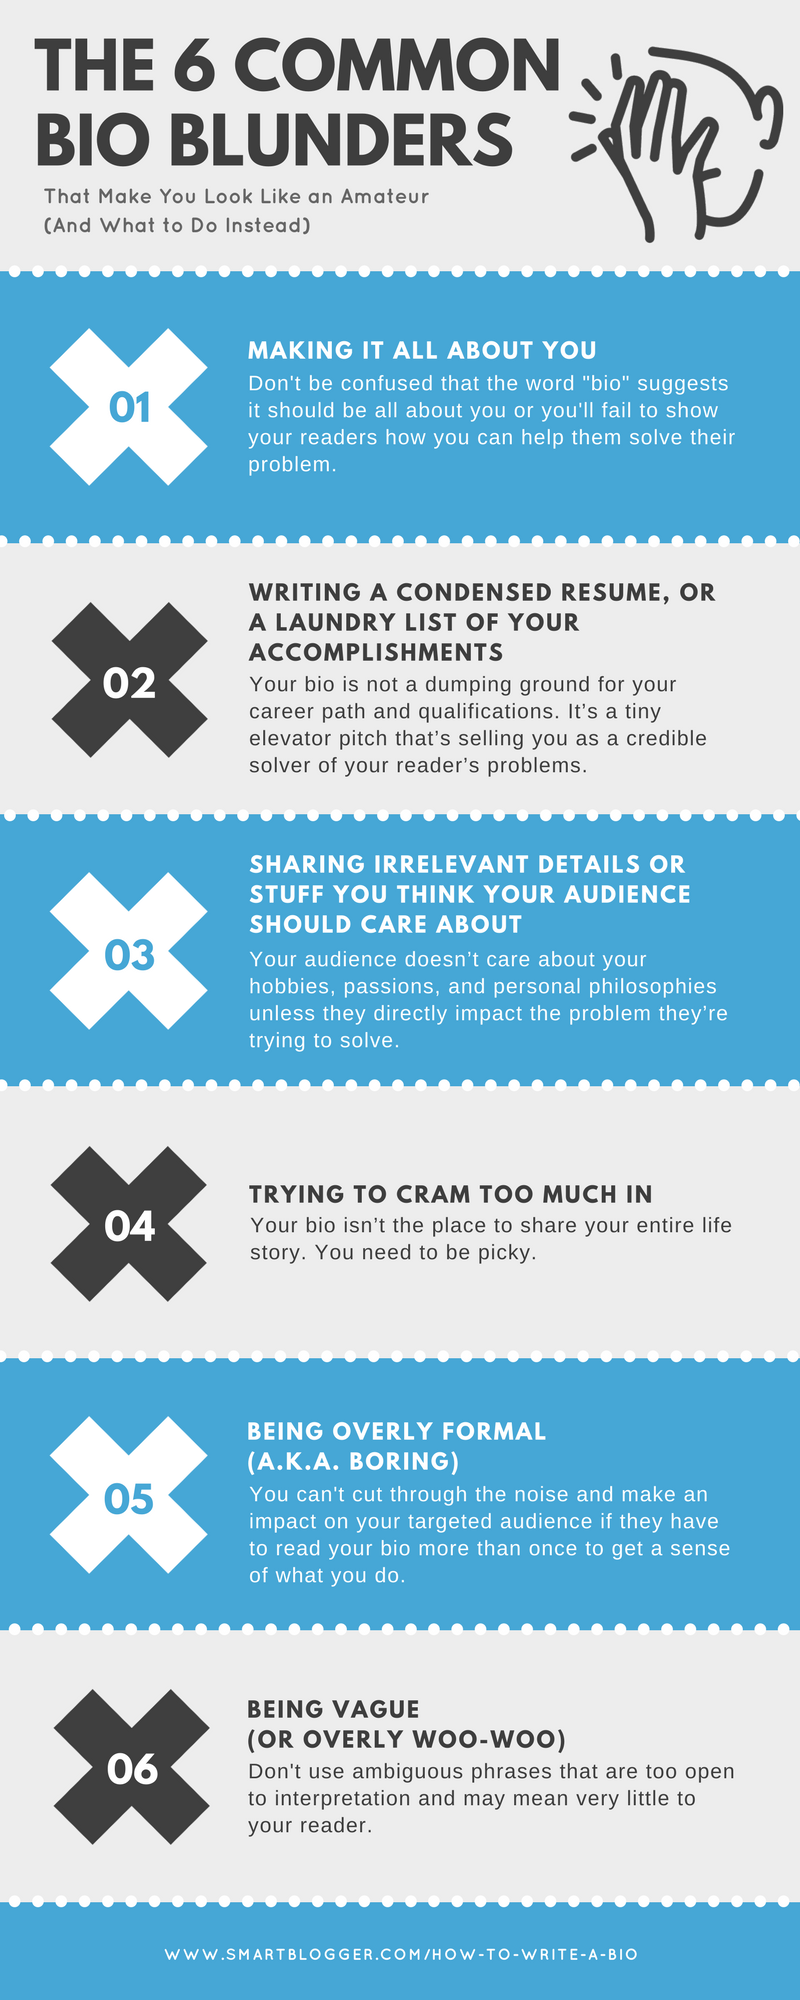
The 6 Common Bio Blunders That Make You Look Like an Amateur (And What to Do Instead)
#1: Making It All About You
Thanks for sharing, Jill. But do I really care? Nah.
It’s confusing, I know. “Bio” is short for biography, which suggests it should be all about you. But the main purpose of your author bio is to show your audience how you can help them solve their problem with the skills you bring to the table.
So, it’s not about you, Jill. It’s about them.
What to Do Instead:
In this post, using almost the same amount of words, Ayodeji gives us just enough information about himself to tell us what he does and how he helps his audience.
It’s clear, precise, and focused on the outcome, not on Ayodeji. He uses phrases like “develop the confidence and habits,” and “make an impact and income,” which directly target the deep-rooted desires of aspiring writers. He speaks their language.
Here’s another tip: It’s usually best to write your bio in the third person, as Ayodeji has. It’s more professional.
#2: Writing a Condensed Resume, or a Laundry List of Accomplishments
Your bio is not a dumping ground for your career path and qualifications. It’s a tiny elevator pitch that’s selling you as a credible solver of your reader’s problems.
So don’t list every degree you have or talk about your first job out of school. Readers don’t really care. They only care whether or not you have the solutions they are looking for.
What to Do Instead:
Your bio should only include details about yourself that directly relate to your audience’s problem.
Think about your career, education, and skills, and then carefully select the most pertinent facts that are going to impress the audience you are writing for. Like this:
Jessi tells us the most important thing about herself (that she is a book editor), and what she can do for her audience (get their books into print), while establishing her credibility (“best-selling,” “editor-in-chief”).
Everything she mentions is designed to appeal to the audience she’s trying to reach.
#3: Sharing Irrelevant Details or Stuff You Think Your Audience Should Care About
This bio is from someone whose expertise is content marketing, although he hides it well.
Much like your degrees and career path, your audience doesn’t care about your hobbies, passions, and personal philosophies either, unless they directly impact the problem they’re trying to solve.
What to Do Instead:
As mentioned earlier, only share the details that your audience will find relevant.
If you’re mad keen on knitting and you’re writing for an arts and crafts blog, then go ahead and mention your passion. It’s relevant. But don’t tell them about your cat, unless Fluffy can knit too.
#4: Trying to Cram Too Much In
Okay, so you’ve managed to include only relevant details about yourself, so you’re safe. Right?
Not if you included too many of them.
Like this one from Jo. She’s had an impressive career, but her bio feels endless:
This is way too much information.
Writing your own bio can be hard. Sometimes you’re too close to the subject matter to realize what’s important and what can be left out. But your bio isn’t the place to share your entire life story. You need to be picky.
What to Do Instead:
With some careful pruning, the real gems hidden away in Jo’s bio can be given center stage:
Go through your bio word by word and ask yourself, “Does this bit of information make any difference to my audience?”
If the answer is no, take it out, and limit your bio to two or three sentences.
#5: Being Overly Formal (a.k.a. Boring)
If you’re anything like me, you had to read this bio more than once to get a sense of what Joe does. It’s way too formal. Most people will just glaze over this.
What to Do Instead:
Instead of using stilted words and phrases like “maximize their online real estate” and “engender business growth” Joe missed a great opportunity to make himself stand out from the crowd by creating a point of interest.
Perhaps he could have started with something like:
Do you see how that might grab a few more eyeballs, cut through the noise, and make an impact with his target audience of doctors?
#6. Being Vague (or Overly Woo-Woo)
Hands up, whoever doesn’t have a clue what this person is talking about. What does she do? How does she help solve my problem? Why should I be interested in her?
You need to avoid ambiguous phrases like “inspiration for growth” and “find their way through the dark.” These phrases might have a nice ring to them, but they mean very little to your reader. They’re too open to interpretation.
What to Do Instead:
You don’t have time to beat around the bush in your bio. Get straight to the point. Like this:
In two sentences, Cecile tells me everything I need to know about what she does and how she can help me. No fluff, no messing about, and a juicy opt-in bribe to seal the deal.
Click on the image below to see a larger view:
Embed This Infographic On Your Site
The 3-Step Process to Writing a Click-Worthy Author Bio
So now you can see where you might’ve gone wrong in the past, and you’re dying to write a new version. But how do you ensure your next bio won’t commit the same blunders?
Easy. Just follow this simple three-step process to write a bio that your ideal readers can’t resist clicking.
Step #1: Introduce Yourself with a Bang
This is where you tell the audience who you are and what makes you different (while avoiding the common blunders we’ve just discussed). You need to spark their interest and curiosity and get them to say, “Tell me more.”
Let’s start with this example from a blogger in the personal development niche.
This tells me what Sue does, but it’s rather dull and same-y in a sea full of personal development blogs. There’s nothing here to set her apart or pique our interest.
Let’s give it a twist:
That sounds a bit more interesting. Sue manages to appeal to her audience on different levels by sounding educated, professional, and personable at the same time. Describing herself as an “agony aunt” downplays the more clinical “social scientist.”
I’m curious to know more, and it certainly makes her distinctive.
But there’s another angle Sue could take:
Now, this one is more similar to the first example, but the difference is that it adds more credibility — “certified psychologist” sounds much more credible than “has a degree in,” which suggests she’s fresh out of college — but it also sets her apart more.
She has a specialty, which gives her ideas on the topic more weight than others. If you suffer from social anxiety, you’d want to listen to the expert on it, right?
Compare also:
This version goes even further in establishing Sue’s credibility. Not only has she published multiple books on the topic of social anxiety, but she’s even been featured on some well-known media channels, adding social proof to her expertise.
We’ve talked before about not delivering a laundry list of accomplishments, but if you have specific accomplishments that make you stand out, those are worth including.
Here’s an excellent bio example that both offers a point of interest and adds credibility:
Jessica doesn’t just say she’ll help you write a business plan, she mentions she has an “outside-the-box approach,” which immediately makes you curious what that approach is. Then she steps it up even more by mentioning her approach has collectively raised $50 million in financing. That’s nothing to sneeze at and creates instant credibility.
It’s an excellent bio that will absolutely pique her audience’s interest.
Step #2: Call Out Your Audience and Say How You Help Them
Remember, this isn’t about you, it’s about what you can do for your audience. So you need to define who they are and what problem of theirs (their key fear or desire) you can solve.
You should aim for both a logical and emotional connection. It’s tough, but do-able.
Let’s take Kim, a blogger in the parenting niche:
By using language most parents will relate to and zeroing in on their fears, Kim makes a strong emotional connection. At the same time, there’s no mistaking the practical (logical) solution Kim offers.
Note: Of course, Kim’s bio would be even further improved if she linked to an incentive rather than her homepage. More on that in the next step!
Here’s another example:
Jessica clarifies immediately who she helps (busy people) and how she helps them (by re-energizing them through food, yoga, and wellness strategies).
You must be absolutely clear about this. If readers can’t identify themselves in your bio and see you have the solution they’re looking for, they will move on.
Step 3: Offer an Irresistible Reason to Click
You’ve told your audience who you are, what you do, and how you can help them. You’ve impressed them with your credentials and sparked their curiosity.
They’re ready to move to second base, but they need that last push. An irresistible reason to click through to your site and sign up. You need to offer an incentive.
Take a look at this bio:
Boom! In 46 carefully curated words, Henneke tells us who she is, what she does, how she can help, and then gives us a gold-plated reason for parting with our email address.
Her free report is 16 parts, but it’s “snackable,” which makes it sound very easy to digest. And it’s for “busy people”, which shows that Henneke understands her audience. She promises results and cleverly relates this back to her own blog, Enchanting Marketing.
Unfortunately, we can’t all steal Henneke’s bio, but we can use it as a fine example of how to write our own.
Ready to Write Your Best Bio Ever?
This three-step process is simple, but it’s not easy, so give your bio the time it requires. You should brainstorm several options for each of the steps.
Bios are hard to craft, but they are also one of the most effective pieces of marketing you can create when you get it right.
Write your best bio ever and your audience will be intrigued. They’ll want to know more and they won’t be able to resist your free offer.
They’ll see you as a credible, personable problem-solver. Their problem-solver.
And they’ll click through to your site, ready and willing to hand over their email address to their new blogging superhero.
You.
from
https://smartblogger.com/how-to-write-a-bio/