
If you want to learn how to start a blog so you can grow an audience and make money, you’ve come to the right place.
With over 3 million readers, we’re one of the world’s biggest websites about blogging. We’ve helped thousands of people start a blog, improve their writing skills, and earn real, tangible income online. And today, we’re going to help you.
In this massive, in-depth guide:
We’ll walk you through the step-by-step process for starting a blog, answer some common blogging questions, and show you free tools and resources that’ll put you on the path to success.
You’ll follow the steps, create your own blog, and start padding your wallet with tens and twenties.
Sound good?
We’ll begin with the question we hear most often…
Should I Start a Blog in 2019?
We’re asked many questions by readers —
How do bloggers make money?
Can I start a blog for free?
How do I choose a good domain name for my blog?
— but they all take a back seat to this one:
Why start a blog? Should I start a blog?
With the dominance of video content on YouTube and Facebook, plus the emergence of “microblogging” platforms like Instagram and Twitter, it’s reasonable to wonder if the whole idea of blogging is a little… well, out of date.
However, the numbers tell a different story:
- Tens of thousands of new blogs are created each day
- According to Statista, the number of bloggers in the United States alone is set to reach 31.7 million by 2020
- On WordPress, 70 million new blog posts are written every month
- Market researchers estimate more than 75% of Internet users read blogs on a regular basis
- Content marketing, which includes blogging, is now a $300 billion industry
In other words:
If your goals are to build an audience and make money online, the question isn’t should you start a blog in 2019 — it’s why wouldn’t you?
So, yes, you should start a blog.
Right now.
And we’re going to show you how, step by step:
1. Pick the Right Blog Topic
Common Blog Topic Questions:
- What are the most popular blog topics?
- How do I come up with a blog idea?
- What should I blog about?
- How to choose blog topics?
- What if I don’t know what to blog about?
We get questions like these a lot, and they usually come from people at their wit’s end.
Want to know the big problem with blogging?
Most people don’t know there’s a huge chance of failure, so they spend months or even years creating a blog that has zero chance of succeeding. Eventually, they give up and start over, but again, they invest months or even years into creating a second (or third or fourth) blog that doesn’t work.
The reason?
It’s not because they’re dumb. And it’s not because they’re lazy.
It’s because they’re choosing the wrong blog topic.
Granted, if you’re starting a personal blog, the rules are different. Do you enjoy the topic? Is it fun? Those are the only two questions that should matter to you.
But if you’re looking to start a blog that will bring in traffic…
If you want to create a blog that will generate passive income…
You need to choose a viable blog topic that has a fighting chance to succeed. Because here’s the part that’s tough to swallow:
All blog topics aren’t viable. Some will fail no matter how good you are or how hard you work.Click To TweetThat’s the bad news.
The good news is we’re going to show you how to pick a winner.
And it’s a lot simpler than you’d think.
How to Choose a Winning Blog Topic
Jot down a list of topics that interest you.
These could be your hobbies, topics you suspect are highly profitable, or something random you read in a magazine while waiting to see the dentist.
To be a viable blog topic, you need to be able to answer “yes” to these five questions:
- Do any existing blogs on this topic have a Facebook page with more than 10k fans?
- Do any blogs on this topic have more than 50k followers on Twitter?
- Does Amazon have any books with more than 30 reviews on this topic?
- When you search for words and phrases related to this topic, are there any Google ads?
- Do any words or phrases related to this topic have more than 100k searches in Google’s Keyword Planner tool?
These questions will let you know whether or not there’s an existing audience for your topic.
Here’s why this is important:
Too many bloggers try to be cute. They hunt for an audience no one else is serving. They think, “if there’s no competition for this topic, creating a successful blog will be easy!”
Wrong.
If there are no competitors, who will link to you? Where will your audience come from? How the heck will anyone find you?
It’s counterintuitive, but the more competition there is in a blogging space, the easier it is for a new blogger to find success in that space.
So, don’t try to be unique. Don’t try to be too clever.
Pick a blog topic that has an existing audience and popular blogs already vying for the audience’s attention.
2. Choose the Right Blogging Platform
Common Blogging Platform Questions:
- Which blogging platform is best for making money?
- What are the best blogging platforms?
- How do I start a blog for free?
- Which free blog platform is best?
- What are the most popular blogging platforms?
We’ll keep this section brief:
There are several free blogging platforms out there, and for what they are, and what they do, they offer solid value.
In fact, we’re big proponents of bloggers starting with a free Medium.com account so they can test their ideas and make sure they’re viable before creating a full-fledged blog.
But once you’re ready to build an audience and make money online, there’s only one blogging platform you should consider:
WordPress.
Or, more specifically, self-hosted WordPress.
As of this writing, 34.6% of all websites use WordPress — including heavyweights like TechCrunch, the Star Wars blog, Mercedes-Benz, and, yes, Smart Blogger.
With virtually unlimited plugins you can install, customizations you can make, and designs you can implement, a self-hosted WordPress blog offers flexibility the free blogging platforms can’t match.
Yes, WordPress is technically free too. However, as we explain in the article linked above:
Because it’s self-hosted, you have to purchase a hosting plan so you can install WordPress on your own web host. That costs money (unless you choose free hosting — more on that later). You also have to purchase your own domain name, which we’ll discuss in a moment.
But don’t let these relatively minor expenses deter you.
If you’re serious about blogging, building an audience, and monetizing your content, you need to set up your blog on a rock-solid foundation.
You need WordPress.
3. Choose a Domain Name
Common Domain Name Questions:
- How do I choose a good domain name for my blog?
- What do I need to know before buying a domain name?
- How do I come up with a good blog name?
- Who is the best domain name registrar?
Put yourselves in the shoes of a visitor.
You’re browsing the web, and you see a headline for a blog post that catches your attention. Maybe a friend on Facebook shared it with you, maybe it came up on a Google search, or maybe it’s just a link in another article you’re reading.
Regardless, you click the link and, consciously or not, you’re asking yourself a single question as you browse through it…
“Is this for me?“
Within a few seconds, you have to decide whether to keep reading the post or move on to something else, and the only way you’ll stay is if it’s relevant to you. Not just the post, either. When you’re deciding, you’ll take in the design of the page, other post headlines, and, yes, the domain name.
For example, consider Entrepreneur.com. Is there any doubt who the site is for? Entrepreneurs, of course!
How about BeABetterBlogger.com? Obviously, it’s for people who want to become better bloggers.
Neither names are clever, but they help you decide to stay or go by clearly articulating who they are helping. That’s what a good domain name does.
Of course, all the great domain names are taken, right?
Not necessarily.
How to Choose a Domain Name for Your Blog
Here are three different methods for finding the perfect domain name:
- Name the audience. The simplest way to get a clear domain name is to call out the audience in the domain itself. (Examples: SmartBlogger.com, CouchPotato.com, AFineParent.com)
- Name the topic. If your blog focuses on a specific topic, try finding a domain name that describes it in clear, concise language. (Examples: ArtofManliness.com, BudgetsAreSexy.com, PaleoHacks.com)
- Name the benefit. Why should people stick around? If you have a good answer, sometimes you can turn it into a new domain name that really stands out. (Examples: BeABetterBlogger.com, MakeALivingWriting.com, BiggerPockets.com)
Our suggestion:
Use these three strategies to make a list of 10-20 domain names you’d be happy having. You can write them out in a word processor or, if you want to get fancy, you can use a blog name generator tool like NameStation to produce a lot of ideas at once.
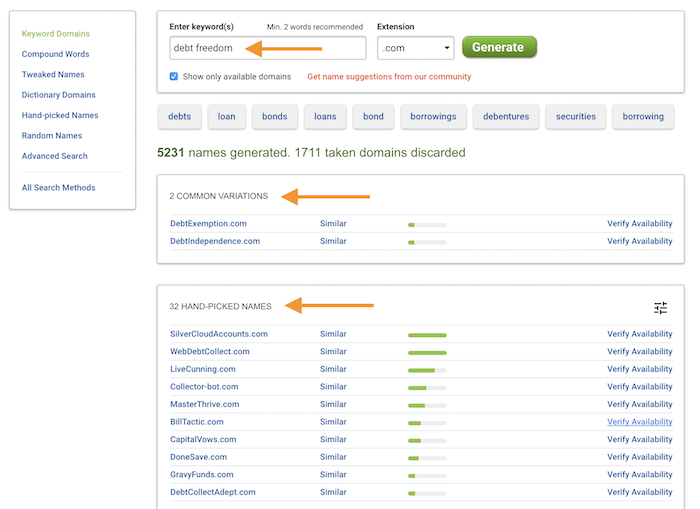
Once you’re finished brainstorming, head over to a domain registrar like Namecheap (affiliate link) to see if the domain names are available.
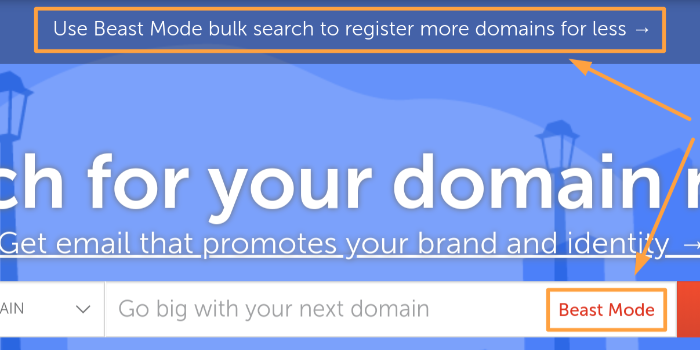
Namecheap’s Beast Mode will let you search for up to 5,000 domain names at one time. You can access it by clicking the “Use Beast Mode…” link at the top of the page, or by entering a keyword and clicking “Beast Mode” next to the search button:
Sometimes you get lucky, and one of your favorites is available. If not, you either have to head back to the drawing board for another brainstorming session, or you can go to a premium domain name marketplace like Sedo.
Either way, a few words of advice:
Don’t get hung up on your domain name. While it’s certainly helpful to have a good one, there are thousands of hugely popular sites with terrible domain names no one understands.
In other words, it’s not really a “make or break” factor for your site. Give yourself a few days or maybe a week to brainstorm ideas, and then make a decision.
4. Purchase a Web Hosting Plan
Common Web Hosting Questions:
- What is web hosting?
- Do I need web hosting with WordPress?
- Do I need to pay for web hosting?
- What is the best free web hosting for WordPress?
- How much does web hosting cost?
- Can I build a blog without hosting?
If you’re not familiar with the term, a “web host” is kind of like a warehouse for websites on the Internet. You pay a small fee to keep your website on the Internet, handle all your visitors, back up your website, and so on.
There are a gazillion different WordPress hosts out there, but the one we recommend to our students is SiteGround (affiliate link).
")
SiteGround is like one of those hole-in-the-wall restaurants that’s both affordable and really freaking good, and it’s quite possibly the best web host out there for beginner bloggers.
Here are a few of our favorite features:
- A technical support team knowledgeable in WordPress
- A built-in Content Delivery Network (CDN) to speed up your site
- Free SSL certificates (so Google will know your site can be trusted)
- Daily backups (so you never lose your data)
And if you’re a new customer, SiteGround offers a 60% discount.
How to Purchase Web Hosting at SiteGround
Go to SiteGround (affiliate link) and click the GET PLAN button underneath the managed WordPress hosting option that best fits your needs.
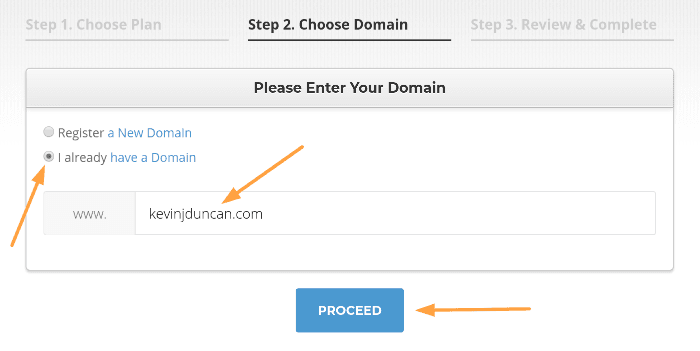
For beginners, we recommend the StartUp plan:

On the next screen, do the following:
- Click the I already have a Domain option
- Enter the domain name you purchased earlier from Namecheap (Example: kevinjduncan.com)
- Click the PROCEED button
On the final screen, you’ll complete four sections:
- Account Information (your email address and password)
- Client Information (your name, mailing address, and phone number)
- Payment Information (Visa, Mastercard, and Discover are accepted)
- Purchase Information (billing period, [optional] extra services)
Let’s look at Purchase Information in more detail:
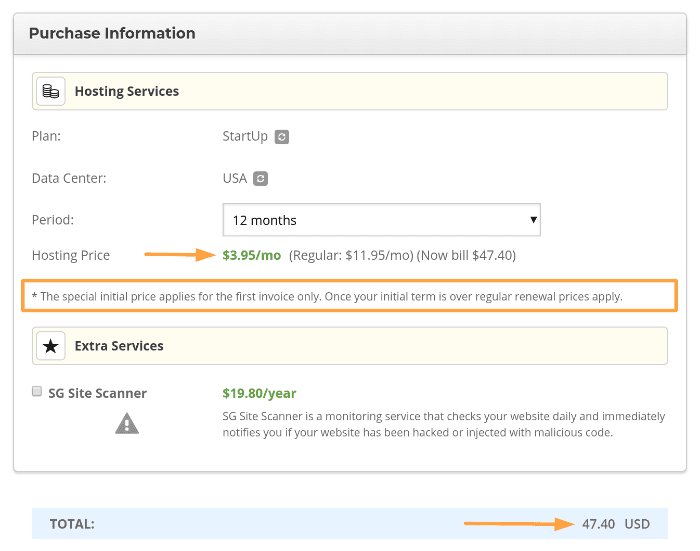
If you choose a 12-month billing period with no extra services or add-ons, your 1-year total will be $47.40.
Decline the Extra Services, review your order, and click the PAY NOW button.
Congratulations! You’ve purchased SiteGround hosting.
Now it’s time to connect it to your Namecheap domain name…
How to Point Your Domain Name to Your Web Host
This next part is a little technical, but we’ll make it as simple and painless as possible.
To connect your Namecheap domain name with your SiteGround hosting account, follow these steps:
- Sign into your Namecheap account.
- Click Domain List on the left-hand sidebar and select MANAGE next to your domain (if you just purchased the domain name, you can also select it from your account’s main Dashboard).
- In the Nameservers section, choose Custom DNS from the drop-down menu.
- Enter your SiteGround name servers. To find them, log into your SiteGround account, click the Go to cPanel button, and copy the Name Servers listed in the ACCOUNT INFORMATION section.
- Save your changes in Namecheap by clicking the green checkmark.
That’s it.
If you need a handy visual, here’s a short YouTube video from Keri Lawrence that’ll walk you through the process:
5. Install WordPress
Common WordPress Installation Questions:
- How do I install WordPress on my website?
- Do I need to install WordPress?
- How do I install WordPress in cPanel?
- How do I install WordPress on a Mac?
With your new domain and web host connected, it’s time to set up WordPress.
Thankfully, SiteGround makes this ridiculously easy — no cPanel or localhost know-how required.
After logging into your SiteGround user panel for the first time, the Account Setup Wizard will appear as a pop-up window:
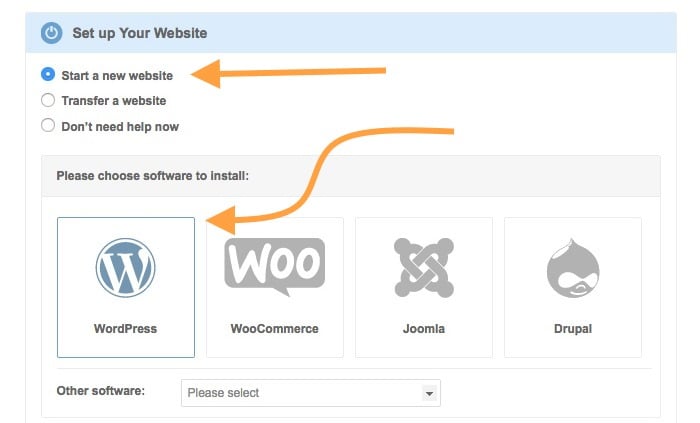
As shown in the screenshot above, click the Start a new website option and select WordPress as the software you want to install.
Next, you’ll create the login details for your WordPress account:
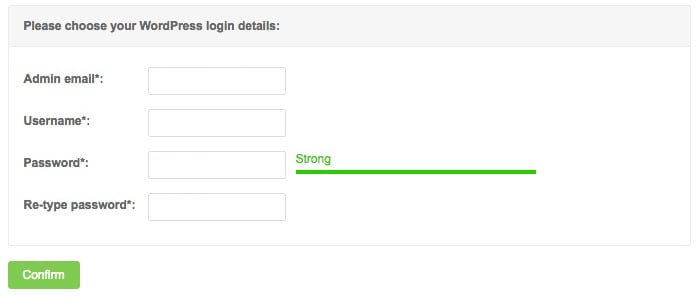
Enter your preferred email address, a good username, and a strong password.
Click the Confirm button to continue.
Finally, after reading the SiteGround Terms of Service, you’ll click the Complete Setup button.
And that’s all there is to it.
SiteGround will now install WordPress for you. In just a few short minutes, you’ll be ready to log into your WordPress Dashboard.
How to Log Into the WordPress Dashboard
In your favorite web browser, go to your WordPress login URL by appending /wp-admin (or /admin or /login or /wp-login) to the end of your domain name.
Examples:
- yourdomain.com/wp-admin
- www.yourdomain.com/admin
- yourdomain.com/login
- www.yourdomain.com/wp-login
You’ll be taken to your WordPress login page:
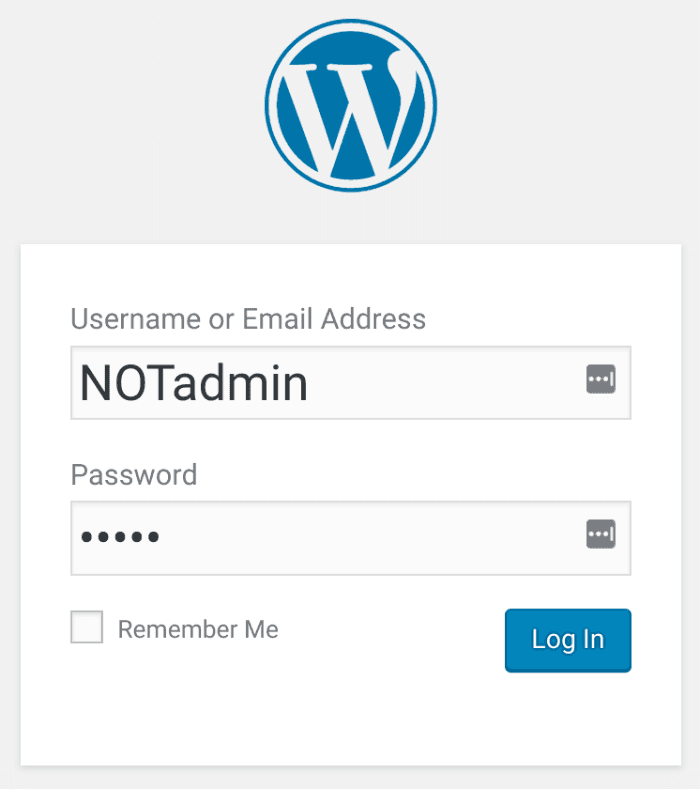
Enter the username and password you created earlier.
Click Log In.
Your WordPress dashboard will look similar to this:
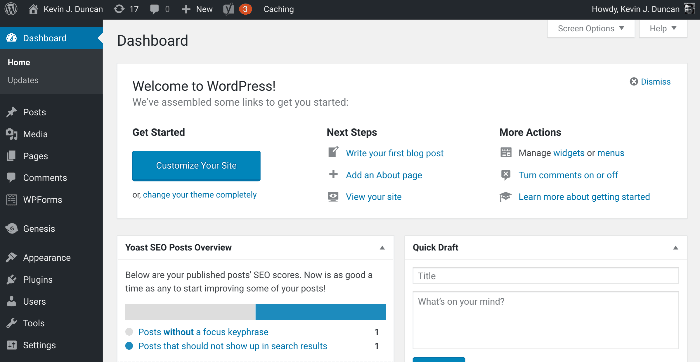
Now for the fun part. Let’s begin customizing your WordPress site.
We’ll start by giving it a new coat of paint.
6. Design Your Blog by Choosing a WordPress Theme
Common WordPress Theme Questions:
- What are WordPress themes?
- How do I choose a WordPress theme?
- How many WordPress themes are there?
- Are there any good free themes?
- What is the most popular free WordPress theme?
Before we begin customizing your WordPress site, we need to be clear about something:
Your content matters more than anything else.
You can have a site that’s ugly, clunky, and slow, but if you have great content, you can still get traffic and earn passive income. Not the opposite, though. You can have the most beautiful, user-friendly website online, but if the content sucks, nobody will care about you.
So, don’t allow yourself to get lost in these details. Focus on making your website functional, and then you can always come back and make it unique or beautiful later.
Make sense? Good.
Now, let’s go over how you can find a great design for your website.
How to Choose a WordPress Theme
In WordPress, your “theme” is the design of your website. It dictates how your blog looks to the world.
There are tens of thousands of theme options out there for you to choose from — some free, some that cost money.
You might think having so many options is a good thing, but it’s actually the opposite. In his book The Paradox of Choice (affiliate link), psychologist Barry Schwartz says having too many choices can lead to decision-making paralysis.
In other words…
The more options you have available, the more likely you are to choose none of the options.
So, we’re going to keep this very simple:
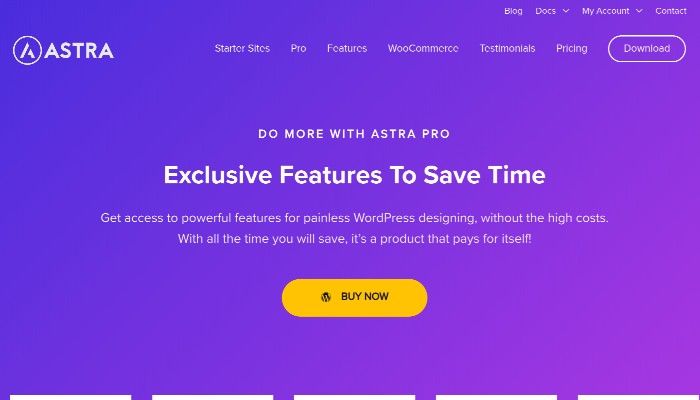
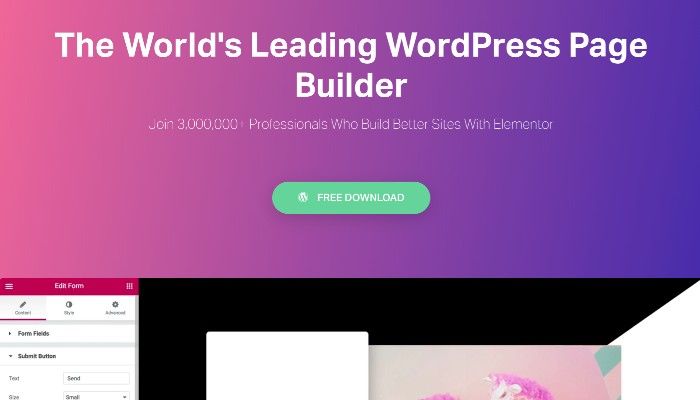
- If you want a free WordPress theme, choose Astra (affiliate link)
- If you want a premium WordPress theme, choose Astra Pro (affiliate link)
- And if you want an advanced page builder that’ll let you customize your design to your heart’s content, choose Elementor Pro (affiliate link)
Astra

Astra Pro
Elementor Pro
Pick the WordPress theme that best fits your situation and needs.
Download it.
Now, let’s install it.
How to Install WordPress Themes
To install a WordPress theme, follow these steps:
- In the left-hand navigation pane, go to Appearance
- Choose Themes
- Click the Add New button

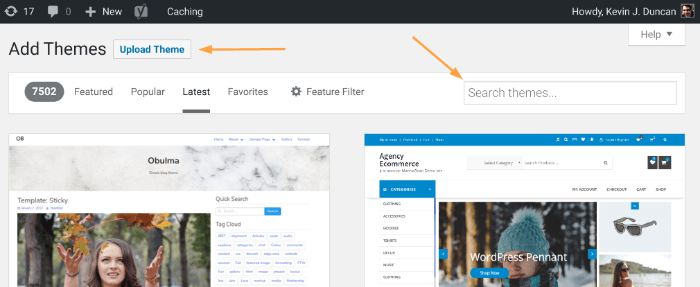
From here, there are two paths you can take:
- Search themes… from WordPress.org’s huge directory of free WordPress themes, or
- Click the Upload Theme button to install a WordPress theme you downloaded from a third party (like Astra or Elementor).
Let’s walk through both paths:
Path #1: Install a New Theme From WordPress.org’s Directory
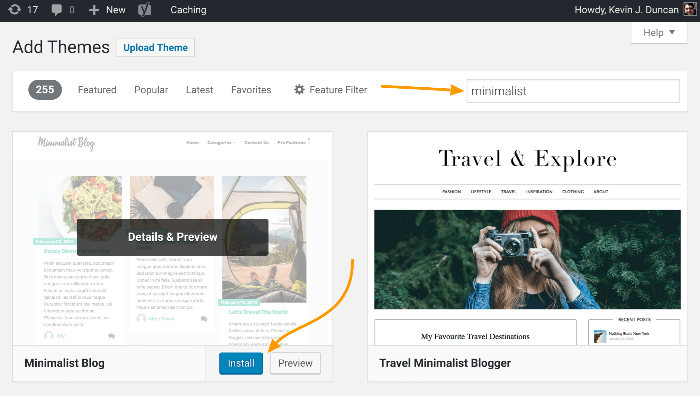
If you want to install a free theme from WordPress.org:
- Enter a theme name or a desired feature (Example: “minimalist”) in the Search themes… field
- Click the Install button
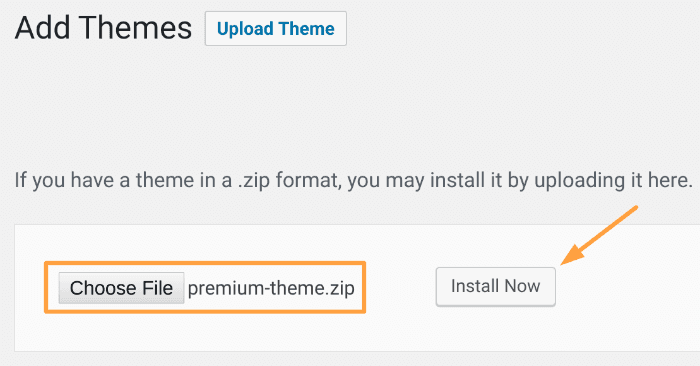
Path #2: Install a Thirty-Party WordPress Theme
If you want to install a WordPress theme you downloaded from a third party, click the Upload Theme button and:
- Click the Choose File button
- Find the third-party theme you downloaded to your computer (Example: premium-theme.zip) and select it
- Click the Install Now button
Whether you choose a free theme or a premium theme, you’ll “activate” it the same way.
We’ll show you how to do that next:
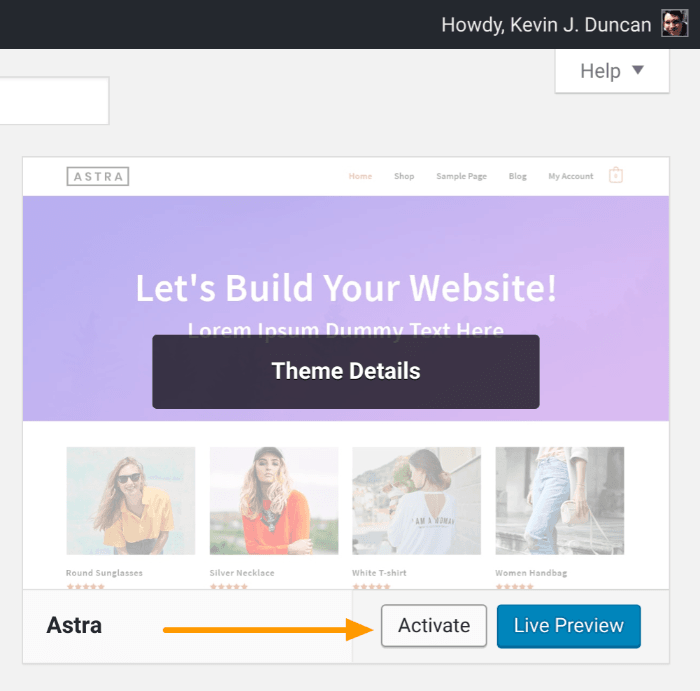
How to Activate a WordPress Theme
Immediately after installing your WordPress theme, you’ll be given the options to “Activate” or “Preview” it.
If you want to immediately publish the theme to your website, click the Activate button. Otherwise:
- In the left-hand navigation pane, go to Appearance
- Choose Themes
You’ll then see every theme you’ve installed, including the “default” themes that are installed automatically by WordPress.
Find the theme you want to use and click the Activate button:
And that’s it.
Your fancy new blog design is now visible to the world!
But is your blog ready for the world? Not yet.
First, we need to improve its functionality. And we’ll start by installing a few WordPress plugins.
7. Install WordPress Plugins
Common WordPress Plugin Questions:
- What are WordPress plugins?
- How do I use WordPress plugins?
- How do I add WordPress plugins?
- Are WordPress plugins free?
WordPress is packed with features. Plugins add even more.
From the 50,000+ free or freemium plugins in the WordPress.org repository to the thousands of premium plugins available from third parties, there is a WordPress plugin for virtually everything.
With so many options available, and with so many articles littered across the web touting “must-have” and “essential” WordPress plugins, most beginner bloggers go overboard. They install so many plugins, their sites slow to a crawl.
Here’s the thing:
There are specific categories or types of WordPress plugins you absolutely need; however, there’s no such thing as an essential plugin.
Anyone who tells you otherwise is giving bad information.
In this next section, we’re going to go over the six categories of WordPress plugins you need to install. And yes, we’ll have a plugin recommendation for each category.
But if you don’t like one of our recommendations, that’s okay. Simply find a different plugin that offers similar functionality.
The 6 Types of WordPress Plugins You Need to Install (+ Recommendations)
- Performance Plugins (Our Pick: WP Super Cache)
- Security Plugins (Our Pick: iThemes Security)
- Backup Plugins (Our Pick: UpdraftPlus)
- SEO Plugins (Our Pick: Yoast SEO)
- Social Sharing Plugins (Our Pick: Social Warfare)
- Email List Building Plugins (Our Pick: Convert Pro)
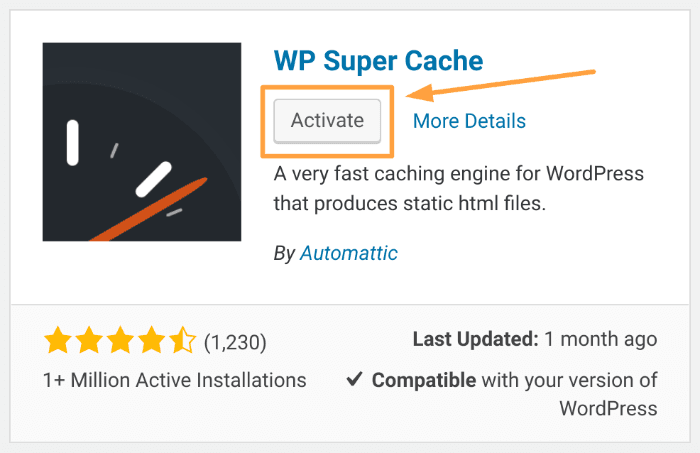
1. Performance Plugins (Our Pick: WP Super Cache)
Why you need a performance plugin: If your blog is slow, your readers will bounce and Google will rank you lower in search engine results. A good performance optimization plugin will “cache” your content so it loads faster.
Why we recommend WP Super Cache: W3 Total Cache is another good option, but we prefer WP Super Cache for its simplicity. The fact it’s maintained by the company behind WordPress, Automattic, doesn’t hurt.
What’s the cost? It’s free.
Note: If you go with SiteGround (affiliate link) as your web host, as we recommended earlier, you won’t need to install a performance plugin like WP Super Cache. SiteGround has its own caching plugin, and it only takes about a minute to set up.
2. Security Plugins (Our Pick: iThemes Security)
Why you need a security plugin: On average, around 30,000 websites are hacked each day. If your idea of securing your blog is simply having a good password, you’re asking for trouble.
Why we recommend iThemes Security: Formerly known as Better WP Security, iThemes Security offers a one-click setup wizard that makes protecting your site easy.
What’s the cost? iThemes Security is free, but they also offer a pro version with extra features.
3. Backup Plugins (Our Pick: UpdraftPlus)

Why you need a backup plugin: Because smart bloggers are always prepared.
Why we recommend UpdraftPlus: It strikes a good balance between flexibility, features, and ease of use. It has a 4.8 out of 5.0 rating on the WordPress plugin repository, and it’s actively updated by its developers.
What’s the cost? UpdraftPlus is free, but they also offer a premium version for $70. Here’s a breakdown of what you get with each plan:

4. SEO Plugins (Our Pick: Yoast SEO)
Why you need a SEO plugin: If you want traffic, you need Google to love your content. By using a good SEO plugin, you can make sure your blog posts are putting their best feet forward.
Why we recommend Yoast SEO: It’s the gold standard of WordPress SEO plugins.
What’s the cost? Yoast SEO has both free and premium versions. Its free version offers everything you need.
5. Social Sharing Plugins (Our Pick: Social Warfare)
Why you need a social sharing plugin: By making it easy for your existing readers to share your posts on their favorite social media channels, social sharing buttons help get more eyes on your quality content.
Why we recommend Social Warfare: There are a lot of social media plugins out there, but we like Social Warfare because it’s lightweight (e.g. doesn’t slow down your website) and offers unique features like “Click to Tweet” boxes and Pinterest-specific images.
What’s the cost? Social Warfare has both a free and pro version. Its free version offers all the basics you’ll need, but if you decide to upgrade the pro version is only $29 (paid annually).
6. Email List Building Plugins (Our Pick: Convert Pro)
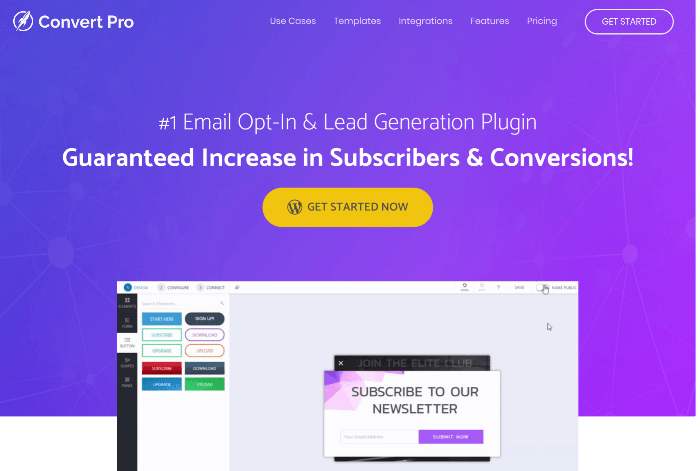
Why you need an email list building plugin: If you want your blog and business to grow, turning traffic into leads is a must. You need a way to capture the email addresses of your readers so you can continue to engage with them.
Why we recommend Convert Pro (affiliate link): Its drag-and-drop editor for creating pop-ups is the most user friendly option we’ve used.
What’s the cost? Convert Pro isn’t free. It costs $99 annually, or $399 for a lifetime license. If cost is a concern, consider the free version of Sumo, which has some great features, but includes company branding.
How to Install WordPress Plugins
Now that we’ve gone over the types of plugins you need, let’s walk through the steps for installing them.
It’s really simple:
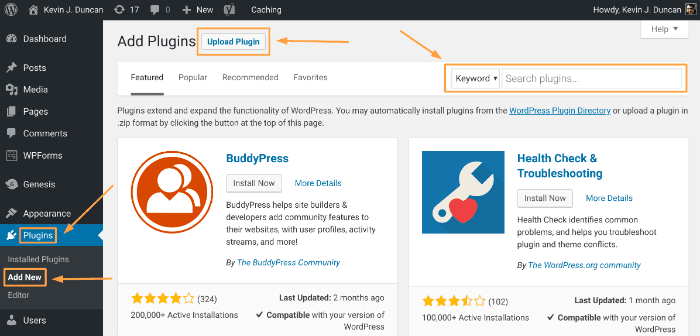
- In the left-hand navigation pane inside your dashboard, go to Plugins
- Choose Add New
You then have two paths you can take:
- Click the Upload Plugin button (if you downloaded a third-party plugin like Convert Pro), or
- Enter the name of the plugin in the Search plugins… field (if you want to find a free plugin from the WordPress.org repository)
Let’s quickly go over both paths:
Path #1: Install a Thirty-Party WordPress Plugin
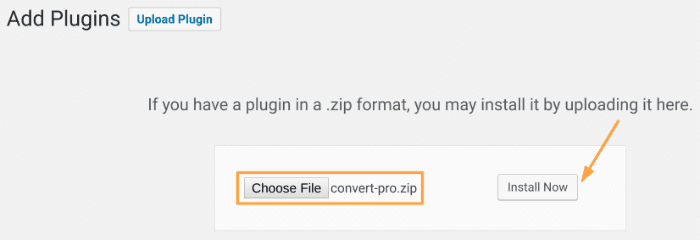
If you want to install a WordPress plugin you downloaded from a third-party website, click the Upload Plugin button and:
- Click the Choose File button
- Find the third-party theme you downloaded to your computer (Example: convert-pro.zip) and select it
- Click the Install Now button
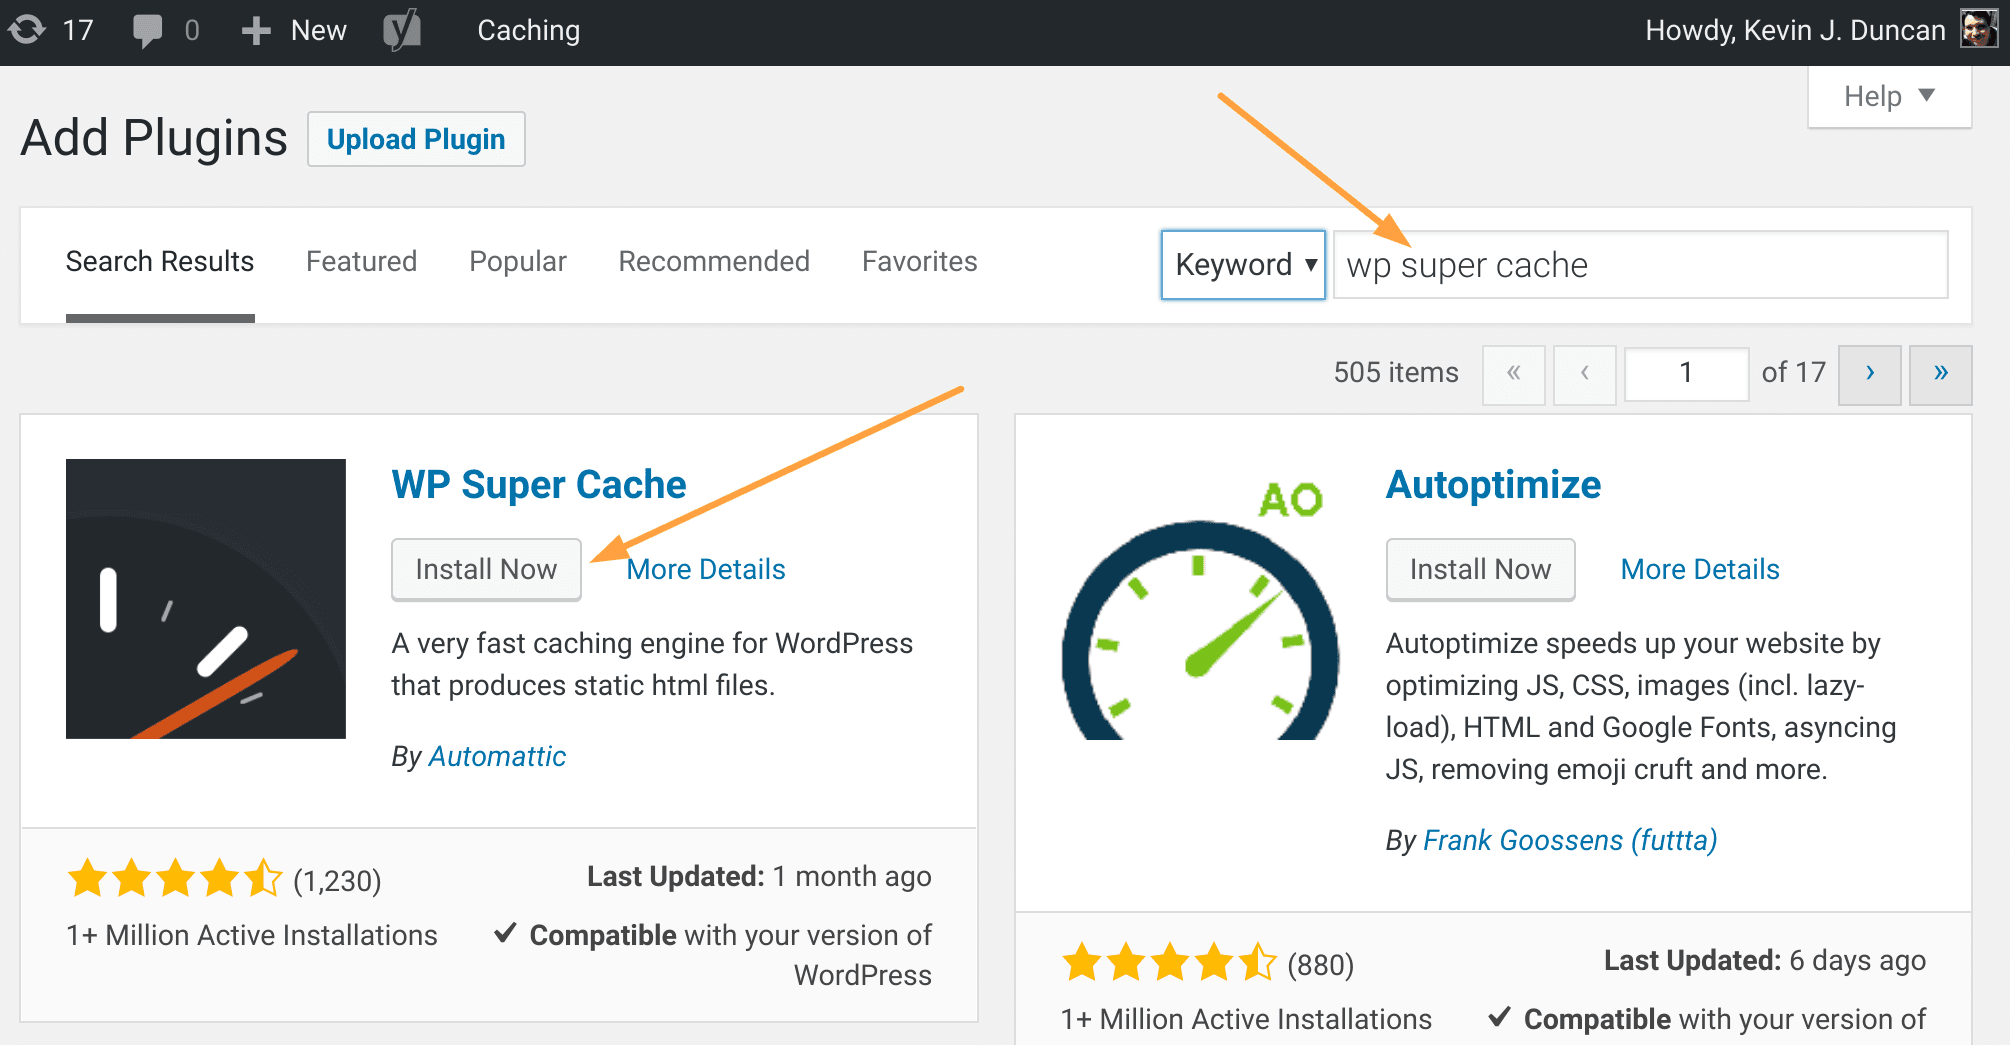
Path #2: Install a Plugin From WordPress.org’s Directory
If you want to install a plugin from WordPress.org:
- Enter the plugin name (Example: “wp super cache”) in the Search plugins… field
- Click the Install button
Told you it was simple.
Of course, just like when we installed a WordPress theme, there’s one more step to take to “activate” your plugin.
Let’s go over that next:
How to Activate a WordPress Plugin
Whether you choose a free plugin from WordPress.org or a premium plugin from a third-party website, you’ll turn it on the same way.
You can click the Activate button that appears immediately after you install it:
Or:
- In the left-hand navigation pane, go to Plugins
- Choose Installed Plugins
- Find your plugin and click Activate

Done.
8. Blog Set Up & SEO (Search Engine Optimization)
Common SEO Questions:
- How can I improve my SEO performance?
- How do I fix my WordPress URL?
- Is SEO important?
- How do I change my website from http to https?
Volumes have been written about on-page SEO, off-page SEO, Google RankBrain, keyword research, search intent, Google Analytics, and all the other intricacies surrounding the ins and outs of getting ranked higher in SERPs (search engine results pages).
We’re going to be straight with you:
If you want to start a blog that brings in traffic, if you want to catapult your content to page one of Google, you’re going to have to roll up your sleeves and learn SEO.
We’ll give you some great reading material in a moment. But first, let’s cover the SEO basics you need to know when doing a new blog set up — the kind of SEO basics often missed in advanced tutorials.
We’ll start with the easiest one.
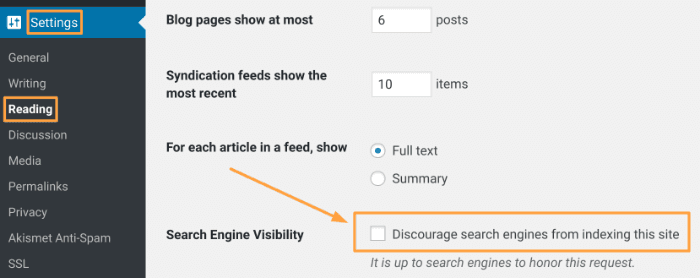
Make Sure Google Can Find Your Website
To ensure search engines like Google and Bing can find your blog, you need to make sure the following is unchecked:
- In the left-hand navigation pane of your WordPress dashboard, hover over Settings
- Click Reading
- Confirm “Discourage search engines from indexing this site” is unchecked
Create an XML Sitemap (and Submit Your Sitemap to Search Engines)
First, a quick definition from Google:
What is a sitemap?
When your blog is new and has few external links pointing to it, a sitemap helps ensure Google is able to discover the amazing content you create.
So, let’s go over how you create a sitemap (and how you can let Google know it exists).
How to Create an XML Sitemap
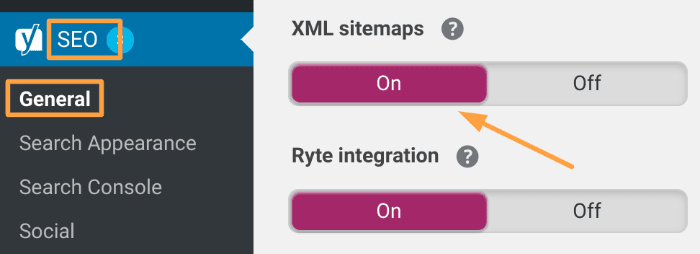
If you installed and activated the Yoast SEO plugin we recommended earlier, creating a sitemap is a snap.
- In the left-hand navigation pane of your WordPress dashboard, hover over SEO
- Click General
- Click the Features tab
- Scroll down to the XML sitemaps option and make sure the switch is toggled to On
You now have an XML sitemap for your blog. Next, we need to give it to Google, Bing, and other search engines.
So before we leave the Yoast SEO plugin, let’s copy the URL of your sitemap:
- Click the question mark icon next to XML sitemaps
- Click the See the XML sitemap link
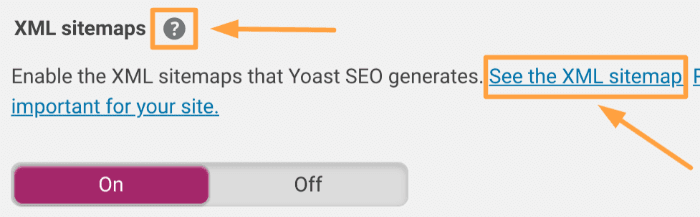
Your sitemap will open in a new tab in your browser.
Copy the URL in the address bar and save it.
How to Submit Your Sitemap to Search Engines
The steps for submitting your sitemap differs from search engine to search engine. We’ll quickly go over the most popular ones, starting with Google:
Submit your Sitemap to Google Search Console
- Go to Google Search Console and sign in using your Google account
- In the left-hand pane, select your website
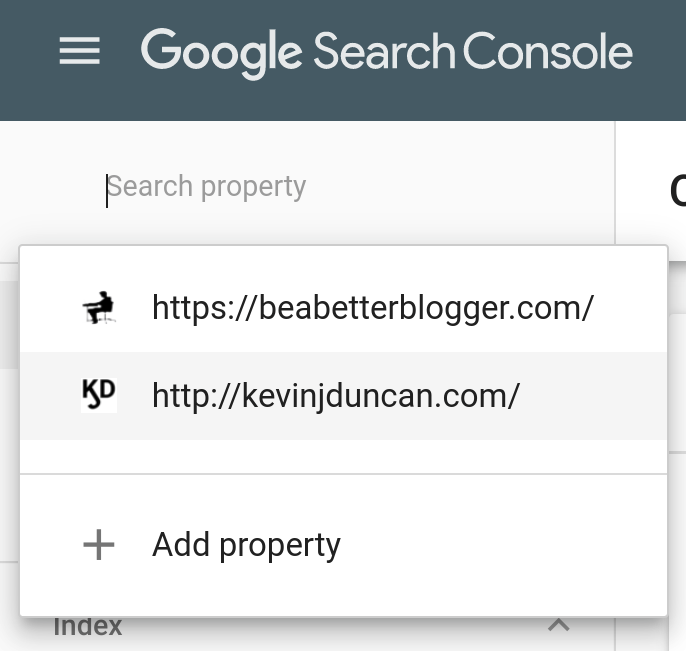
Note: If you haven’t yet added your website to Google Search Console, you’ll need to click “Add property” and follow the steps provided before continuing below.
- Under Index, click the Sitemaps option
- In the Add a new sitemap section, enter the URL you saved earlier and click Submit

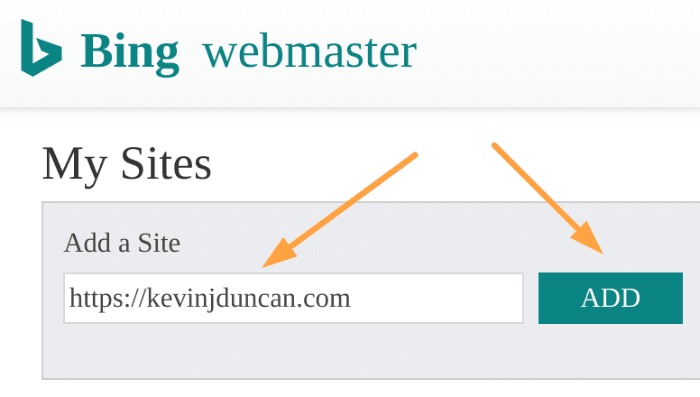
Submit your Sitemap to Bing Webmaster Tools
- Log into Bing Webmaster Tools (you’ll need to create an account if you have not yet done so)
- Under the My Sites section, click your website
Note: If you haven’t yet added your website to Bing Webmaster Tools, enter your blog’s URL in the Add a Site section and click the ADD button.
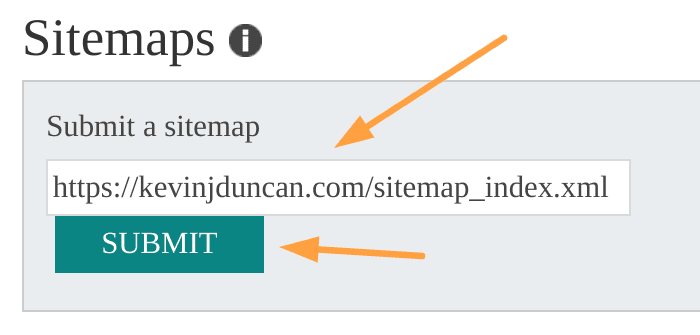
- In the left-hand pane, click Configure My Site and choose Sitemaps
- Enter the URL of your sitemap in the Submit a sitemap section and click the Submit button
And that’s it.
You’ve successfully submitted your sitemap to Google and Bing.
Change Permalinks Structure
By default, WordPress sets the links on your blog to the following format:
- yourdomain.com/?p=123
Why do they do this? No one knows for sure. “For grins and giggles” is the theory we’re going with.
But regardless of the reason, you need to update this link structure before you publish a single piece of content.
Here’s how you do it:
- In the left-hand navigation pane, hover over Settings
- Click Permalinks
- Under Common Settings, set the option to Post name
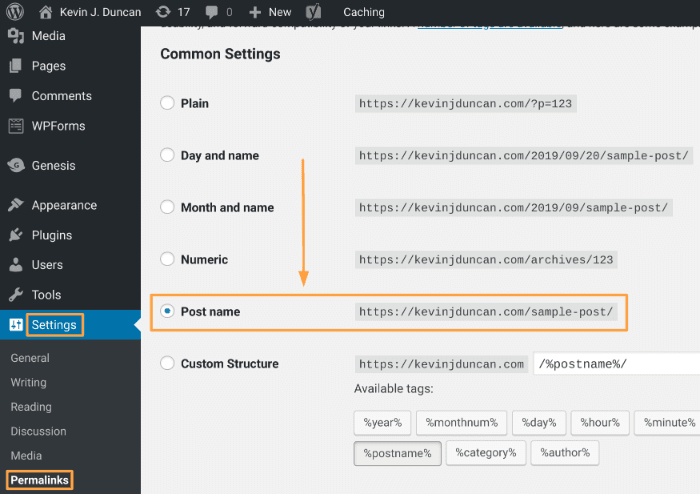
Now your links will look like this:
- yourdomain.com/how-to-brew-coffee
- www.yourdomain.com/seo-tips
- yourdomain.com/social-media-strategies
Not only is this link structure better for your readers, but it’s better for search engines like Google too.
Install an SSL Certificate (So Your URL Begins With https Instead of http)
Speaking of things Google likes…
You absolutely, positively must install an SSL certificate for your website. Here’s why:
- Readers will know your website is safe
- Your website will be safe thanks to the encryption of readers’ sensitive data and personal info
- Google sees it as a ranking signal, which means not having an SSL certificate will hurt your content’s rankings in search results
Okay, so what is an SSL certificate? How do you know if a website has one or not?
Look for a secure padlock and https in a website’s URL:
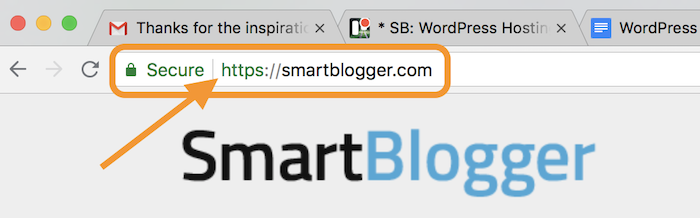
If the URL has them, the website is secure. If it doesn’t, it isn’t.
How to Install an SSL Certificate
Your web hosting package from SiteGround (affiliate link) includes free SSL certificates from Let’s Encrypt.
Here’s how you install them:
- Log into your SiteGround account
- Click the Go to cPanel button
- In the Security section, click Let’s Encrypt
- Select your domain name, choose the Let’s Encrypt SSL option, and click the Install button
A few moments later, your SSL certificate will be up and running!
If you need more guidance, check out SiteGround’s Let’s Encrypt tutorial.
9. Write Your First Post!
Common Blog Post Questions:
- How do you structure a blog post?
- How long is a blog post?
- Can you write 3000 words in a day?
- How do you write an introduction?
- How to write a blog post for SEO?
Can we be honest for a minute?
This is the fun part. Writing your first blog post. Taking ideas in your head, turning them into words on the screen, and sharing them with the world.
Let’s walk through how you do it.
Up first, the basics:
How to Start a Blog Post in WordPress
- In the left-hand pane of your WordPress dashboard, hover over Posts
- Click Add New
If you’re using the new WordPress block editor (aka the Gutenberg editor), your screen will look like this:
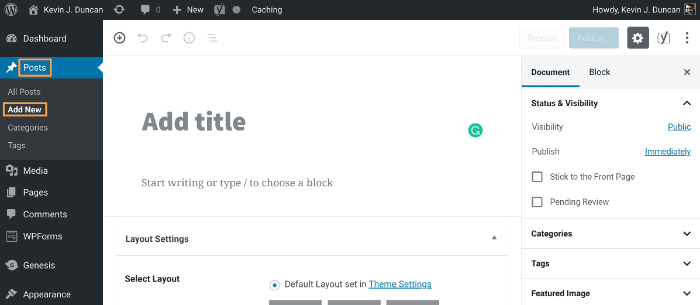
If you’re using the classic TinyMCE content editor, you’ll see this:
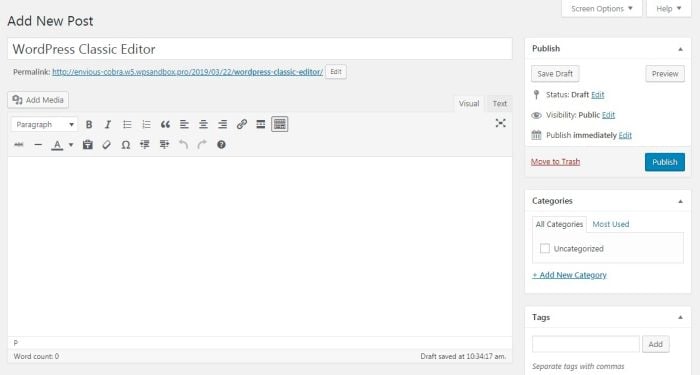
Either way, you’ll be able to add a title (aka headline), write your post, choose your category, add images, and more.
- In the left-hand pane of your dashboard, go to Pages
- Click Add New
For detailed instructions on how to navigate the classic content editor, WordPress offers a detailed support article.
If you’re using the WordPress block editor, let’s go over the basic navigation so you’ll know how to get around.
Block Navigation in Gutenberg
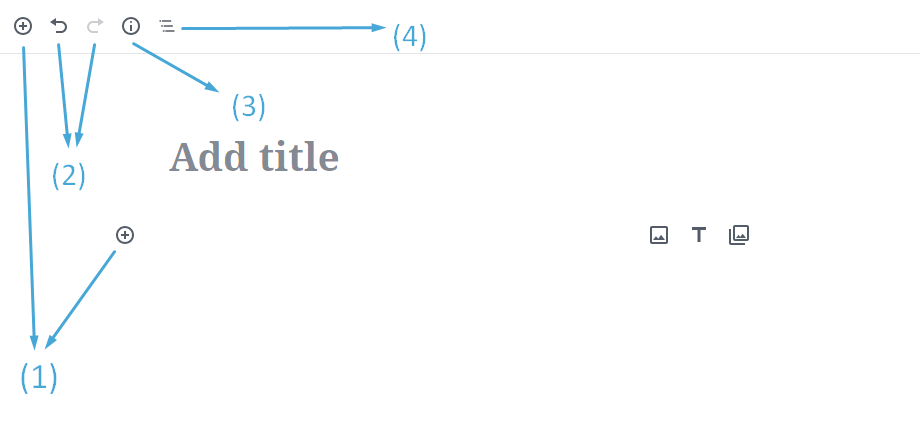
- Add a new block
- Undo and Redo buttons
- Content structure (word count, headings, paragraphs, blocks)
- Block navigation (a drop-down displaying all the block types used in the post)
Next, the sidebar navigation:
Sidebar Navigation in Gutenberg
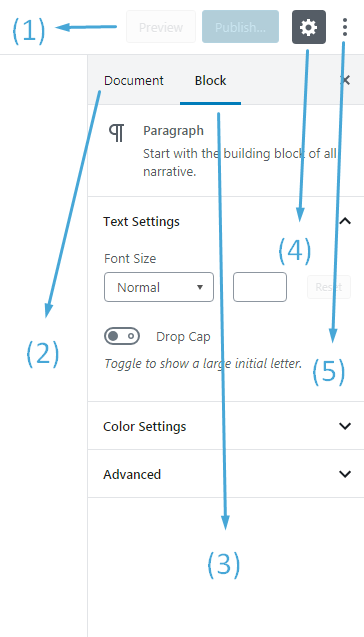
- Preview and Publish the post
- Categories, tags, permalink, and publishing options
- Block settings (unique options dependent on the type of block you’re using
- Hide the sidebar
- More editor settings
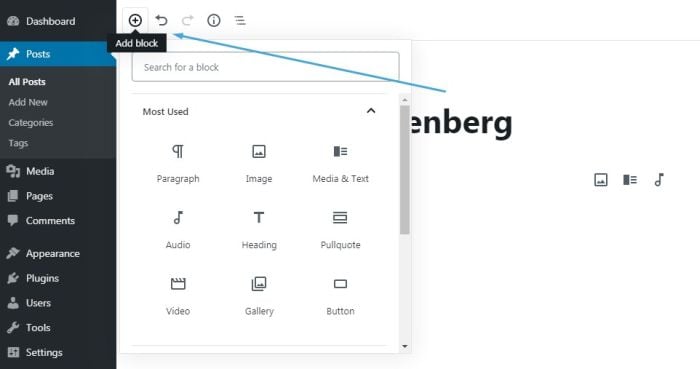
How to Add a Block in the Block Editor
Click the plus (+) sign in the top-left corner.
Choose the category and the type of block you want to add:
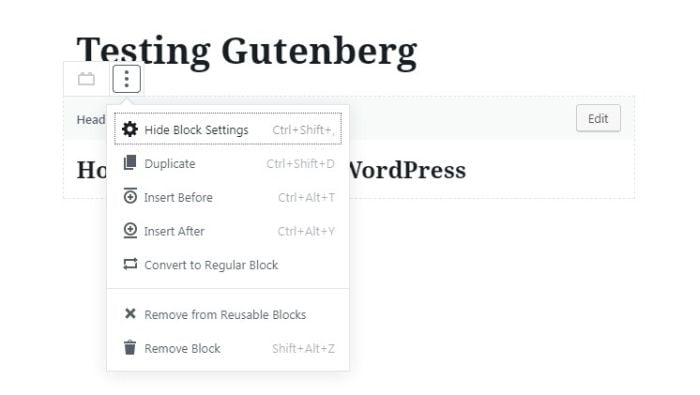
Each block can be edited, deleted, saved as reusable, and moved up or down with drag-and-drop options:
Don’t worry — WordPress blocks, widgets, and the like will get easier the more you use them.
Now let’s tackle the writing questions we hear most often from bloggers.
Question: “How Do I Find Blog Post Ideas?”
We typically recommend two methods:
1. Use BuzzSumo
BuzzSumo is a tool that lets you find popular posts on social media. If you need inspiration, what’s easier than browsing content that’s already doing well with your target audience?
2. Find the Thing That Keeps Your Readers Awake at Night
In other words:
What has your readers tossing and turning at two o’clock in the morning?
Are they wondering how to get more traffic to their blogs? Are they suffering from writer imposter syndrome? Or maybe they’re struggling with blog promotion?
Bloggers who are able to answer this burning issue, and who make a concerted effort to write about it and only it, have a leg up on the competition.
So, find your readers’ pain point. And then focus on helping them solve it.
Question: “How Do You Write a Good Headline?”
Copy the professionals.
Browse Smart Blogger and your other favorite blogs. Look for patterns. You should notice “list” and “how to” headlines are quite popular.
There’s a reason for this:
Decades of copywriting and advertising research have revealed certain types of headlines convert better than others.
Why mess with what works?
Question: “How Do I Write a Good Introduction?”
There are several good techniques for writing spellbinding introductions. Here are five of our favorites:
- Empathize with your reader
- Ask a tantlizing opening question
- Alternate between short and longer paragraphs — give your writing a rhythm
- Use delayed transitions
- Use deliberate repetition of certain words to heighten their impact
Each of the above techniques draws the reader in and keeps them engaged. They’ll want to dive deeper into your post to find out what happens next.
Question: “How Can I Increase my Writing Speed?”
Eliminate as many distractions as possible.
This could mean turning off your phone, buying noise-canceling headphones, or even logging out of your email.
One unconventional trick is to turn off your grammar and spellcheck. Those squiggly red lines are your friends when you’re proofreading, but they’re your enemy when you’re trying to write faster.

Question: “How Can I Improve My Writing Skills?”
It’s cliche, but you have to practice.
When Brian Clark of Copyblogger took a young editor under his wing years ago, he made him write 100 headlines every single day. That editor, who coincidently went on to launch one of the world’s biggest websites about blogging, got really good at writing headlines.
So, practice. Lots and lots of practice. And reading these resources will help too:
- 600+ Power Words That’ll Pack Your Writing with Emotion — Ever wish there was a shortcut to tap into your readers’ emotions? An easy way to make them feel exactly what you want? Well there is. Power words.
- 581 Sensory Words to Take Your Writing from Bland to Brilliant — Are your words falling a little flat? Looking for ways to add a little punch and pizzazz to your writing? This massive, in-depth guide tackles a secret weapon used by literary greats, businesses, writers, and bloggers alike: sensory words.
- 297 Flabby Words and Phrases That Rob Your Writing of All Its Power — Ever worry that your writing lacks power? Did you know that certain words and phrases can weaken your writing without you realizing? Learn which ones here.
- Writer’s Block: 27 Techniques to Overcome It Forever — How can you overcome writer’s block? Try these refreshingly original techniques to shake up your inner muse.
- Proofreading: 7 Editing Tips That’ll Make You a Better Writer — Ever wonder why your writing lacks the impact of your writing heroes? Find out the simple secret they don’t want you to know.
- How to Become a Better Writer: 14 Tips to Up Your Writing Game — Want a resource that summarizes our favorite writing tips? If you’re struggling with your writing skills, reading this post should be your first step.
10. Boost Your Traffic, Promote Your Blog, and Master Social Media
Common Traffic, Blog Promotion, and Social Media Questions:
- How do I compete in a competitive niche?
- How can I increase my blog traffic?
- Why is social media good for promotion?
- How do you promote a blog?
- How do I get people to read my blog?
Let’s be honest:
When you’re a beginner blogger, no one is paying attention to you. You could write the most amazing piece of content the world has ever seen, and no one’s going to know it even exists.
Unless…
Unless you tell them about it.
You need to spend just as much time promoting your posts as you do writing them. At a minimum. Ideally, you’ll spend more time promoting them than writing them.
Here are some tips so you can get the most out of your promotional efforts:
Tip #1: Focus on One Social Media Platform
If you try to kick butt on every social media platform, you’re going to fail.
There are simply too many platforms out there, and there’s only so much time in the day. If you try to be everywhere, you’ll drown.

You (probably)
Here’s what you should do instead:
Pick one social media platform. Focus on it. Forget the others (for a long while, anyway).
Which platform depends on where your ideal readers hang out. For some niches, that’ll be Facebook. For others, it’ll be Twitter, Pinterest, or Instagram.
Find the best social media platform for your blog’s niche, join it, and dominate it.
Here’s how:
Learn How to do Pinterest (the Right Way)
![]() Depending on your niche and audience, Pinterest can be a significant traffic source.
Depending on your niche and audience, Pinterest can be a significant traffic source.
If your Pinterest game is lacking, check out 9 Ways to Go Viral on Pinterest and Get an Avalanche of Traffic and implement the tips we discuss.
Drive Traffic to Your Site (and Connect With Influencers) Using Twitter
![]() Tweeting is easy.
Tweeting is easy.
Tweeting well, and harnessing the power of Twitter to drive traffic to your blog and connect with influencers, is difficult.
In 10 Simple Twitter Tactics That Will Get You More Traffic Today, we offer strategies to get Twitter traffic (and to get onto the radars of influencers).
If Twitter is your social media platform of choice, be sure to read it.
Become a Facebook Kung-fu Master
![]() Whether you love or loathe (or merely tolerate) Facebook, there’s no denying it is huge.
Whether you love or loathe (or merely tolerate) Facebook, there’s no denying it is huge.
Facebook is so huge that, most likely, regardless of your niche, it’s where most of your readers hang out on social media.
If that’s the case, you need to master it.
These two posts will help:
- How to Get 3,241 Facebook Fans per Day Without Paying for Ads (Incredible Case Study)
- How to Use Facebook Groups to Get More Traffic and Traction for Your Blog
Answer Questions on Quora
![]() If you’re unfamiliar, Quora is a Q&A platform where anyone can post a question and get answers from experts in the community.
If you’re unfamiliar, Quora is a Q&A platform where anyone can post a question and get answers from experts in the community.
And it’s used by savvy bloggers (like our friends over at Ahrefs), to send traffic to their websites.
To learn more about Quora and how you can use it to boost your blog’s traffic, check out How to Turn Quora into a Traffic-Driving Machine for Your Blog.
Tip #2: Avoid These 4 Traffic Techniques That Are a Waste of Time for Beginners
Traffic strategies have been around for years. As a result, some of them are a bit long in the tooth.
Some of the following traffic techniques are dead (and have been for a while), while some can get you a little traffic but are too time-intensive.
Either way, when you’re a beginner, you should avoid these 4 traffic techniques:
1. Commenting on Popular Blogs
Once upon a time, this used to be effective, but as the blogosphere has grown, and popular blogs have received more and more comment spam, its return on investment has fallen dramatically.
Yes, blog commenting can open doors to a future relationship with the blogger, but if getting click-throughs to your blog is your primary goal, you’re going to be disappointed.
2. Submitting Your Site to Directories
Years ago, submitting your site to directories used to be a viable traffic resource and an essential part of SEO, but the benefits have disappeared.
Here’s what Google’s John Mueller had to say way back in 2017 when he was asked if submitting to directories had any SEO value:
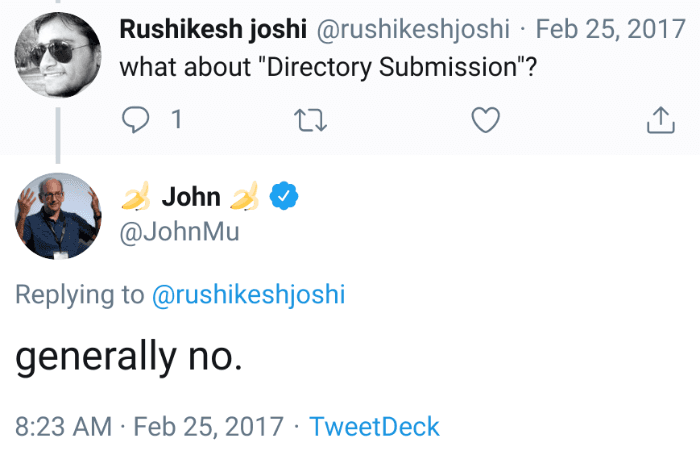
In short, this strategy has been dead for a long time.
3. Trying to go Viral on Reddit, Hacker News, etc.
While these sites can drive enormous traffic, it’s difficult to get your content to the front page until you have lots of readers to vote for it.
Cross this strategy off your list until you hit 1,000 email subscribers (at a minimum).
4. Paying for a Unique Design
You’d think paying for a unique blog design would help establish your legitimacy and lead to more traffic, but in reality, it doesn’t have any effect on traffic at all.
You’re far better off using a free or inexpensive WordPress theme like Astra (affiliate link), and investing the money elsewhere.
Tip #3: Make Powerful Friends by Reaching Out to Influencers
 When you’re a beginner blogger, building an audience is difficult.
Want to know a shortcut?
Get someone influential to introduce you to their audience.
Here’s how you do it:
- Find the movers and shakers in your niche
- Get on their radars
- Reach out to them
It sounds easy, but there’s quite a bit of hard work involved. A lot, actually.
And here’s the kicker:
Every other beginner blogger will be doing outreach too. So will experienced bloggers. Even influential bloggers who blog full-time (including the ones you’re trying to connect with) will be doing it.
Every blogger who wants to grow their audience is pounding the pavement and reaching out to other bloggers (or paying someone to do it for them) in the hopes of making powerful friends.
In short, there’s a lot of competition. So if you want your outreach efforts to be effective, you need a solid plan.
Blogger Outreach: How to Get Influencers to Promote Your Content for Free is packed with proven outreach techniques.
Read it and follow it.
Tip #4: Pay for Facebook Ads
We hesitated even including this section.
Here’s the thing:
When you’re starting out, you should not spend money on Facebook ads. Or Google ads. Or whatever LinkedIn is doing these days.
But once you have a solid foundation in place, once you’ve reached 1,000 email subscribers, once you have traffic starting to roll in from Google search results… consider supercharging your efforts by learning the ins and outs of Facebook advertisements.
Here’s a primer to get you started: How I Got 532 Subscribers in 43 Days Using Cheap Facebook Ads.
11. Build Your Email List (Get Started NOW!)
Common Email List Questions:
- How do you make an email list from scratch?
- What is an ethical bribe or subscriber bribe?
- What are the best email marketing services?
- Can you make money with email marketing?
If you polled a hundred experienced bloggers who have been around the block or two, and you asked them for their biggest blogging mistake, you’d hear one answer more than any another:
“I wish I started building my email list sooner.”
Learn from their mistakes. Start building your email list on day one. Get started now.
We’ll walk you through the step-by-step process.
1. Pick an Email Marketing Service
There are a lot of good email marketing service providers…
- AWeber
- ConvertKit
- Keap
- Drip
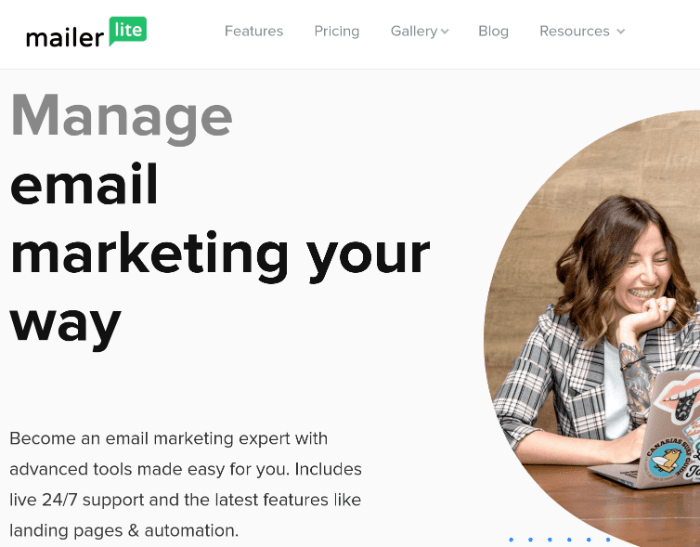
…but when you’re starting out, you need to keep your expenses in check wherever you can. That’s why we recommend MailerLite to our students, which is free for users with 1,000 or fewer subscribers.
Once you hit the magic 1k number, you can either upgrade to one of MailerLite’s paid plans or switch to a different email marketing service provider.
So, don’t overthink it. You need an email marketing provider to start building your email list. Get a solid one that won’t cost you any money.
2. Strategically Place Optin Forms on Your Blog
Using an email list plugin like Convert Pro (affiliate link) or Sumo, place optin forms throughout your website:
In Your Header

Inside Your Content
On a Landing Page
In Pop-Ups
In Your Sidebar

On Your “About” or Contact Form Page
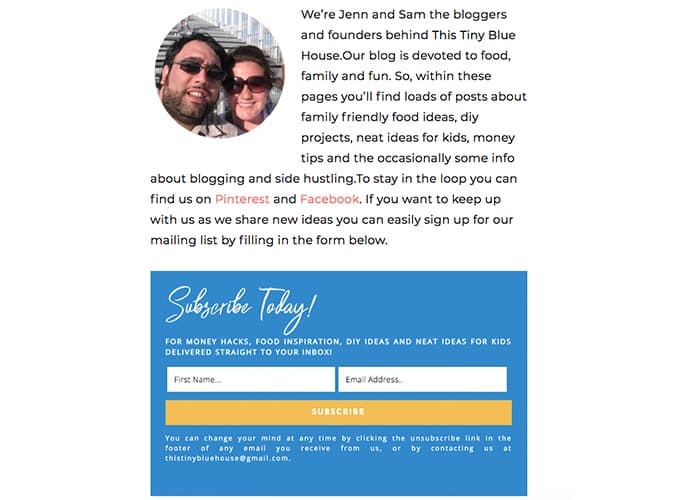
3. Give People a Reason to Give You Their Email Address by Offering an Ethical Bribe (aka Subscriber Bribe)
Even if they like you, most people won’t give you their email address out of the goodness of the heart.
No, you need to give them a reason.
Ethical bribes (also known as subscriber bribes, lead magnets, opt-in bribes, free offers, free gifts, and content upgrade) give readers a reason to hand over their email address to you.
They give you their email, you give them a free gift.
That’s all there is to it.
The trap many bloggers fall into is they try to get too big and creative with their lead magnet. As a result, they often fail to create one at all.
The lesson?
Keep your subscriber bribe simple. Our recommendation:
Start with a simple, one-page PDF checklist.
If you doubt a highly-focused, one-page download can be useful and appealing to readers, check out the following examples:
- Ramit Sethi of I Will Teach You To Be Rich once offered a downloadable PDF (“20 Questions Your Financially Unprepared Friends are Afraid Of”) as a lead magnet, which was essentially a single page of useful questions.
- MeetEdgar’s Laura Roeder (formerly of LKR Social Media) once offered readers a “Master Blog Strategy Worksheet” — a single page containing nine strategy-related questions.
- Copyblogger had “11 Essential Ingredients Every Blog Post Needs” as its ethical bribe, a simple one-pager that was less than 100 words in its entirety.
Each of these one-page checklists was short, simple, and super effective.
With these three steps, you’ll start your blogging journey in a better position than 99% of your competitors.
And when/if you’re ready to learn more about email marketing and building your email list, be sure to check out these helpful resources:
- Email Marketing 101: The Simple, Definitive Guide for 2019
- How to Run a Simple Contest and Add 500 New Subscribers to Your List
- 9 Irresistible Incentives That’ll Grow Your Email List Like Crazy
- The Ultimate List-Builder’s Resource Guide: 109 Links to Double or Even Triple Your Subscribers
- Are You Damaging Your Email List with These 11 Rookie Mistakes?
- 7 Emails You Should Send Your Subscribers (But Probably Don’t)
12. Make Money Blogging
Common Make Money Questions:
- How do beginner blogs make money?
- How do bloggers get paid?
- Is blogging still profitable?
- What type of blogs make money?
- How much time does it take to start making money from blogging?
So, you have a blog and you’re ready to start making money?
Awesome.
In a moment, we’re going to tell you precisely what to do to generate passive income as a beginner blogger.
But first, we’re going to tell you what you shouldn’t do…
Please, whatever you do, don’t cover your blog in Google Adsense when you’re just starting out.
Seriously, we wrote an entire post detailing why blog ads suck for monetizing your site. And we named it — yep, you guessed it — 13 Reasons Why Blog Ads Suck for Monetizing Your Site.
We encourage you to read it if you’re thinking about plastering blog ads all over your site, but here are the highlights:
- Blog ads pay peanuts
- They distract your readers
- They make your blog look cheap and sleazy
Okay, so that’s what not to do. Here’s what you should do:
Affiliate Marketing
We believe the best monetization method for bloggers is to build an audience that trusts them, and then offer high-quality products or services that will truly, genuinely help that audience.
Most bloggers hear this advice and decide to run off and create a book or course, but we think that’s a mistake when you’re a beginner.
If you’re not careful, you can waste months or even years creating a product your audience doesn’t want. You don’t want that — trust us.
Instead, we recommend you promote affiliate offers from reputable companies that offer money-back guarantees.
It works like this:
- You introduce your readers to a product or service from a trusted source
- Your readers look at the product or service, decide it will help them, and purchase it
- You earn a commission on the sales
The beauty of affiliate marketing is you win multiple ways. You help your audience, you earn money, and — most importantly — you learn what types of products and services your audience likes to buy.
Once you have this information, then you can go out and create your own products, courses, or e-commerce sites around it. Only this time, you won’t be guessing there’s an audience for it. You’ll know it.
We’ve written two great resources on affiliate marketing and affiliate networks. Before you dip your toes into the affiliate waters, be sure to read both thoroughly:
- Affiliate Marketing: What It Is and How to Start Making Money
- The 8 Best Affiliate Networks for Earning Passive Income
More Money Making Possibilities
Affiliate marketing is the easiest monetization method for beginners, but there are other options too.
Check out these in-depth resources we’ve put together:
- How to Become a Freelance Writer and Get Paid $200 – $1K per Post — Want to become a freelance writer? This comprehensive guide walks you through how to get started, where to find clients, and how to scale.
- 21 Dumb Mistakes to Avoid When Writing Your First E-book — Want to write an e-book so you can earn some passive income? Check out these 21 basic mistakes to make sure you’re not sabotaging your e-book’s success from the start.
- How to Make Money Writing: 5 Ways to Get Paid to Write in 2019 — Is it easy? No. But it’s certainly possible. This post shows you exactly how to make money writing — everything from getting paid to write for magazines to publishing your own Kindle book. All in one place.
- Kindle Direct Publishing: How to Make Real Money on Amazon — With Kindle publishing, you can self-publish your book on Amazon and start making money within 24 hours. This massive, how-to KDP guide will show you how.
- How to Run Your First Webinar (with No Skills, No Stress and No Budget) — Does running a webinar sound scary and expensive? Here’s how to run a simple webinar that builds trust and authority without spending a single penny.
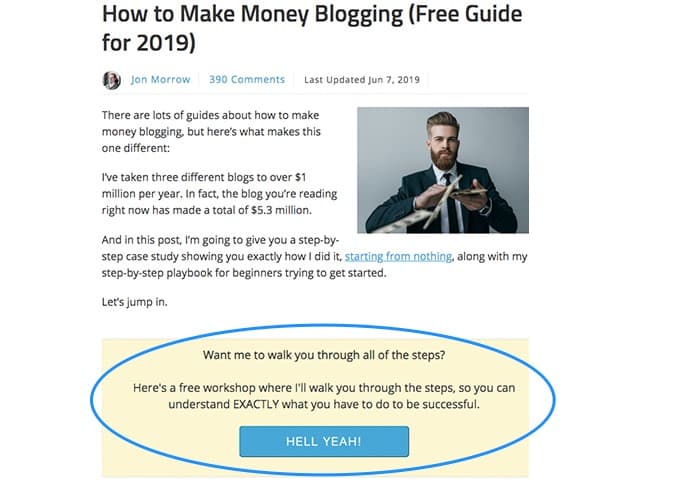
- How to Make Money Blogging (Free Guide for 2019) — Can you make money blogging? The answer is YES — if you follow these hard-won lessons for building a profitable blog from scratch.
- 7 Membership Sites that Make $100K+ Per Year (Real Examples) — Wondering if you should create a membership site? Take a look at these 10 real-world examples of membership sites making $100K+ per year for inspiration.
How to Start a Blog and Get Paid: FAQ
Before we wrap things up, let’s look at some common questions we receive (that we haven’t already addressed above).
This is an ever-expanding list, so if you have a question we haven’t covered about how to start a blog, please feel free to ask us in the comments section.
How Much Does a Beginning Blogger Make?
If you’re working for another company, you can make as much as $50,000 per year. Professional content marketers get paid very well.
On the other hand, most beginning bloggers are hobbyists. They tinker around in their spare time and seldom make much.
If you do commit to blogging over the long-term, and you start a truly popular blog, you can make millions. It’s a long road, and most people fail, but it’s achievable.
What is a Blog?
According to WordPress:
What is a blog?
Blogs have grown up a good bit from their “weblog” days, of course.
How Much Does a Blog Cost?
It really depends.
If your blogging goals aren’t to grow an audience and make money, you can blog on Medium. It’s free, and it’ll allow your inner writer to shine.
However, if you’re wanting to earn passive income with blogging, you’ll need to purchase certain things.
For example:
- A domain name from Namecheap (affiliate link) starts at $8.88 per year for a .com domain name extension.
- Web hosting from SiteGround (affiliate link) is $3.95 per month for the first billing period.
For a running tally, check out The Shocking Cost of Running a Blog (and How to Create a Realistic Budget).
What is Gutenberg?
Also known as the WordPress block editor, the Gutenberg editor went live as part of WordPress version 5.0 in December 2018.
It’s a modern, drag-and-drop editor that replaced the classic TinyMCE editor. If you’d like to learn more about it, check out WordPress Block Editor: The Ultimate Gutenberg Guide.
How do I Start a Personal Blog?
If all you need is a personal blog (no email list, no affiliate marketing, etc.), go with Medium.com.
It’s free, it’s easy to use, and it has a nice, modern aesthetic (if you’re into that sort of thing).
Is WordPress Free?
WordPress.com is free to use. Self-hosted WordPress.org software is technically free too (anyone can download it). However, since it’s self-hosted, you will need to pay for web hosting and domain name registration.
What Can I do to Stop Spam Comments?
Since it’s the biggest blogging platform in the world, WordPress is a popular target of comment spammers.
And while there’s nothing you can do to prevent spam comments completely (short of turning off commenting functionality on your site), there are steps you can take (in addition to installing an anti-spam plugin) to strengthen your defenses and minimize the amount of spam you receive.
Hold Comments in Moderation
If you want to hold first-time commenters in moderation until you can review and approve their comment, follow these steps:
- In the left-hand navigation pane, hover over Settings
- Click Discussion
- In the Email me whenever section, check the Anyone posts a comment and A comment is held for moderation options
- In the Before a comment appears section, check the Comment author must have a previously approved comment option
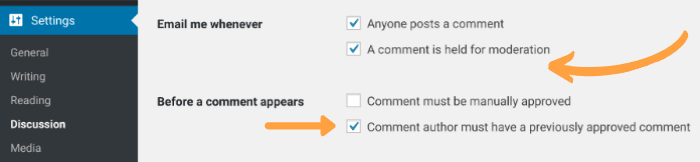
If you want to hold all comments in moderation, even from individuals who have had comments approved previously, check the Comment must be manually approved option:
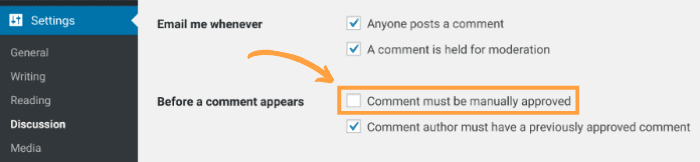
The latter will ensure spam comments aren’t able to sneak through and be live on your blog for the world to see, but it means you’ll need to diligently review the pending comments in your dashboard.
Close Comments After a Certain Number of Days
Most legitimate comments you receive will arrive during the first few weeks after your post has been published. Closing down the comments section of a post after a certain period of time is an easy way to cut down on the amount of spam you receive.
Here’s how you can do it:
- In the left-hand navigation pane, hover over Settings
- Click Discussion
- In the Other comment settings section, check the Automatically close comments on articles older than X days option
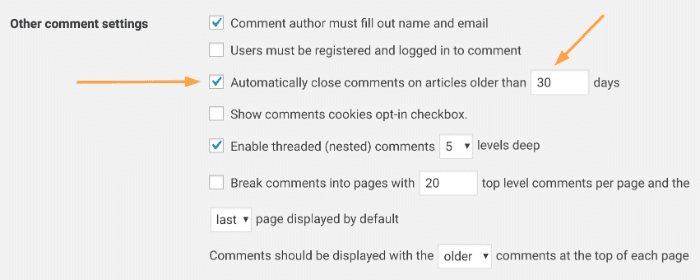
Enter the number of days you would like to pass before comments are closed. Periods of 30 days and 60 days are common.
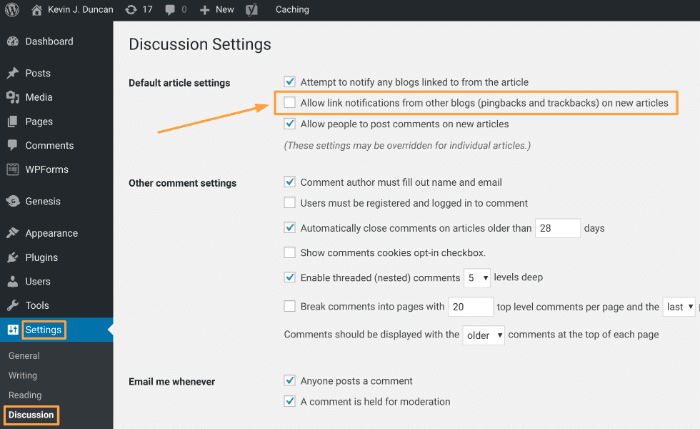
Turn Off Pingbacks
A pingback is a notification that appears in your comments section when another blog has linked to it.
Sounds great, but the problem is pingbacks are easily abused by spammers. If your blog is pingback-enabled, your comments can become overrun with spam.
It’s best to turn off pingbacks. Here’s how you do it:
- In the left-hand navigation pane, hover over Settings
- Click Discussion
- In the Default article settings section, uncheck the Allow link notifications from other blogs (pingbacks and trackbacks) on new articles option
How Can I Avoid the Most Common Blogging Mistakes?
Even experts make mistakes. How do you think they became experts? Trial and error, baby.
Fortunately, you have a choice. Learn the hard way and bump your head against the same mistakes as everyone else, or use your brain and learn from the failures of others.
If you want to avoid some common pitfalls, read these posts:
- How to Write Good Comments That Stand Out — Here’s the thing: most blog comments suck. What does a great blog comment look like, and how do you write one? Here’s a simple four-part formula that works every time.
- 12 Blogging Mistakes That Make You Look like a World-Class Idiot — Don’t be surprised when you publish your great idea, hoping it buzzes around the blogosphere, and it tanks. Not just tanks – but explodes in an inferno of criticism.
- 6 SEO Sins That’ll Put You on Google’s Naughty List — Did you know Google can make your blog disappear from its search results? Here are the six mistakes most likely to land you on their naughty list.
- Why Posting Every Day is a Silly Strategy (And What to Do Instead) — If you doubt your ability to be a successful blogger, it may be your strategy; most specifically, posting every day. Here’s why this strategy is downright dangerous.
- Why You Shouldn’t Create a Newsletter (and What to Do Instead) — Once upon a time, the online newsletter produced enormous profits for all kinds of businesses. Nowadays, it’s just pure foolishness.
The Bottom Line on How to Start a Blog (and Get Paid)
You know you’re in rarified air, right?
Most people who read about how to start a blog don’t follow through. They want to start a blog and they talk about it nonstop, sure, but they never take action.
Years from now, they’ll still be skimming posts like this one, nodding along with the words, and wishing they had the courage to make it happen.
But not you.
You’re going to take the steps we’ve outlined above and knock them out one by one. You’re going to create a blog, grow an audience, and start earning a real, tangible income.
And you’re not going to wait days, weeks, or months before you get started. You’re going to start a blog right now, today.
If you have any questions or hiccups, we’re right here to help you.
Are you ready?
Then let’s do this thing.
About the Authors
 Jon Morrow has asked repeatedly to be called “His Royal Awesomeness” but no one listens to him. So, he settles for CEO of Smart Blogger. Poor man. 🙂
 When he’s not busy telling waitresses, baristas, and anyone else who crosses his path that Jon once said he was in the top 1% of bloggers, Kevin J. Duncan is the Editor-in-Chief for Smart Blogger.
P.S. from Jon: Kevin wrote nearly all of this. Much of it is based on my ideas, but if you want to know who to thank for putting together such an awesome resource, it’s him.
The post How to Start a Blog in 2019 (+ Resources on EVERYTHING!) appeared first on Smart Blogger.
from
https://smartblogger.com/how-to-start-a-blog/