
Know what’s tougher than creating great content?
Creating it at scale.
But that’s exactly what’s needed if you’re serious about building a popular blog.
And almost every successful blogger reaches a point where they realize they can’t do it alone.
(After all, how many large blogs can you name where the owner still writes every single post?)
Getting help means outsourcing at least some of your content creation to guest writers, but making the transition from a writer to the editor isn’t easy.
So how can you efficiently manage the content development process when you have dozens of different writers, each with posts in various stages of development?
How can you maintain your high-quality standards without becoming so overwhelmed that you begin feeling nostalgic for the days where you were doing everything yourself?
Truthfully, until a couple of years ago, I didn’t have a good answer to that question.
My Daunting First Dive into Major League Blogging
Almost exactly three years ago, I edited my first post for Boost Blog Traffic (as Smart Blogger was then called).
And honestly, I was feeling the pressure.
I’d edited dozens of student posts as an instructor in Jon’s celebrated guest blogging class, but editing a post by an established writer for one of the most respected blogs on the web felt like an entirely different level of responsibility.
(Though I’m still in the position, so I guess it went okay!)
But Jon’s goal in trying me out as editor was to move from an ad-hoc publishing schedule, where he still wrote most of the posts, to a weekly schedule, where guest bloggers assumed most of the writing duties.
Why? Because his company was growing rapidly and his responsibilities as CEO were demanding more and more of his time. In other words, he’d reached that point where he couldn’t do it alone.
When I took over the reins, there wasn’t much in the way of a process. I’ve learned over the years that Jon’s not much of a process guy. 
Guest authors usually submitted their work as Microsoft Word documents, so we’d pass versions of the file back and forth until the post was ready.
While I loved working with the writers, the practical side of the process was frustrating.
Why Microsoft Word Sucks for Blog Content Development
What I realized in my first few months as editor of the blog was that my frustration was primarily due to the tools we used.
Microsoft Word is a powerful application, but it has so many features that the average user only needs a tiny fraction of them. And for creating blog content, which tends to have fairly simple formatting needs, Word is frankly overkill.
Also, it can introduce the following issues:
- Version control. After collaborating with an author over several drafts, I’d usually find my hard drive littered with several different copies of the post, not always certain which was the latest one.
- Compatibility problems. Sometimes one version of the software won’t open files created in a later version. Or files created on a Mac don’t look the same on a PC. Neither is conducive to happy collaboration.
- Formatting frustrations. Historically, content does not paste very cleanly from Word into WordPress. Even though things have improved, the results are still very dependent on the templates and styles used within Word.
- Large file sizes. Microsoft Word files can quickly become hefty, particularly those with embedded images. Passing large files back and forth via email can be time-consuming.
So if Word introduces more problems than it solves, some of them related to the transition from Word to WordPress, how about developing all your content in WordPress from the start?
Why WordPress Causes Content Problems Too
There’s no doubt WordPress has earned its place as the preeminent platform for bloggers.
But it’s primarily designed for publishing content, not creating it.
Developing your content in the same environment you’ll publish it may seem appealing, but there are some good reasons you might want to do it somewhere else, particularly when working with external contributors.
Here’s why a separate content development environment may be a better idea:
- Clean separation of published posts and posts in development. When working with guest authors it’s inevitable that some of those posts will get delayed or abandoned. Do you really want those unfinished posts cluttering up your WordPress database?
- Reduced complexity and risk. Giving lots of different people access to your WordPress installation may not be such a great idea. Sure, if you set everything up right, security shouldn’t be an issue but make a mistake with user roles and you could open yourself up to a whole host of problems.
- Content safely stored outside of WordPress. If your WordPress site gets hacked or accidentally wiped you can always restore from backup, right? Well yes, in theory, but we’ve all heard stories of people who lost all their content because they neglected to take a backup or because their backup solution wasn’t quite as bulletproof as they imagined.
Of course, if you’re determined to keep everything in WordPress, there are clever plugins that will turn your installation into a fully blown editorial management system with pre-defined workflows.
But that’s probably overkill unless your blog is already huge, and it still lacks some of the advantages above.
So what’s the alternative? Google Docs.
Two years ago we switched to a simple editorial workflow based on Google Docs, and we haven’t looked back.
In fact, since then, we’ve used it to develop over 300,000 words of content for this blog!
3 Reasons Google Docs Rocks for Content Collaboration
If you’ve not used Google Docs yet, it’s one of several lightweight Office-style applications that Google provides via Google Drive, its cloud-based storage service.
Some people use Google Drive solely for its remote storage, but if you ignore the apps that come along with it, you’re missing a trick.
In addition to Docs, Google also provides other online apps, free to anyone with a Google account, including:
- Google Sheets — a spreadsheet app which can replace Microsoft Excel for most tasks
- Google Slides — a presentation app that duplicates much of the functionality of PowerPoint or Keynote
- Google Drawings — a drawing app for creating simple diagrams
But why is Google Docs in particular so well-suited to blog content development?
Let’s take a look at a few reasons:
- Cloud-based — conveniently maintains a backup of your content, so you can always access your up-to-date posts-in-progress from anywhere, without an internet connection
- Tracked changes — automatically records every change you make to a document, so it’s easy to revert to any previous version of your work
- Native collaboration features — natively supports editing by multiple authors, including in-document conversations via comments, edit and suggest modes
On top of these advantages, it’s also free!
A Crash Course in Google Docs for Busy Bloggers
Even if you have worked with Google Docs before, you may not be aware of its full capabilities, so let’s take a quick look at some of the key features.
Creating a New Document
Creating a new document is easy. From within your Google Drive, just click the big, red “New” button and select “Google Docs” from the drop-down menu.
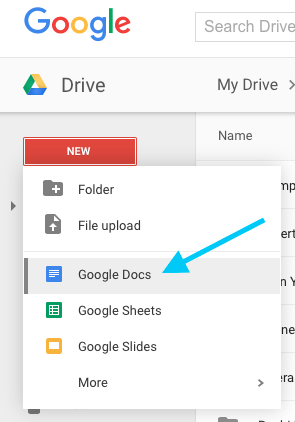
This will create a new Google Docs document in your Drive.
Then, click “Untitled document” to change its name:
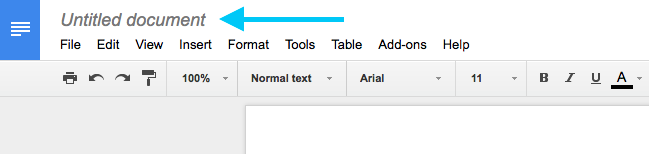
Once inside your document, most of the toolbar and menu options should look familiar — Docs is much like a simplified version of Microsoft Word and offers many of the features you’d expect, such as:
- Bold, italic, underline text styles
- Plain and number bullets
- Customizable heading styles
- Tables
- Headers and footers
As you add content to the document your changes are automatically saved to the cloud, so there’s no chance of losing your valuable work!
Another nifty feature is offline editing. With this enabled, you can work on your documents even without a network connection — your changes will sync once you’re back online.
Sharing Your Document with a Collaborator
While Google Docs also functions well as a simple word processor for writing your posts, it comes into its own when other people are involved in the process.
One common scenario is where you have guest authors developing content for your blog. Another is where you’re working with an editor to polish your work.
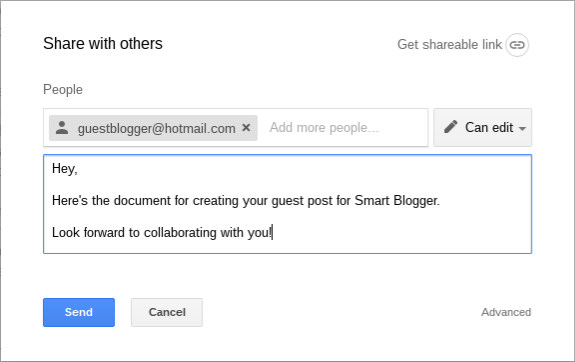
Sharing your document with someone else is as simple as clicking the blue “Share” button:

This brings up a “Share with others” dialog box:
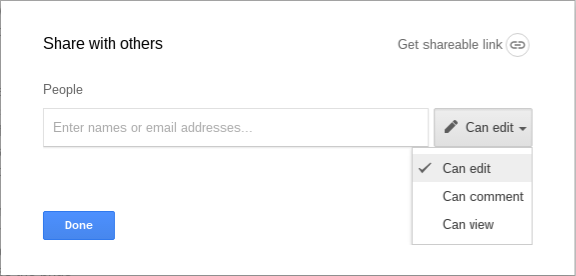
You have three options when granting permissions:
- Can edit — the recipient has full permissions to edit the document, adding and deleting content
- Can comment — the recipient can’t edit the content but they can add comments in the margin
- Can view — the recipient has read-only access, in other words they can see the content but can’t edit it or add any comments
Once you’ve selected the appropriate permissions, enter the email address of the person you’re sharing the document with (they’ll need to have a Google account). Optionally, you can add a personal message to send along with the sharing notification.
Adding Comments to Existing Content
Google Docs supports adding comments within your document. These are text notes that are visible within the document but aren’t technically part of the content itself.
Use comments to:
- Leave notes for yourself, e.g. “Remember to check this statistic before publishing.”
- Leave notes for other collaborators, e.g., “Can we find a better example for this?”
The powerful thing about comments is that they are attached to a specific context within the document, which makes them perfect for editors working with guest authors. If you don’t like the particular word choice or feel a sentence is redundant, you can attach a comment to a designated piece of text.
Adding a comment is simple. Just highlight the text you want to comment on and either press the comment button or select Insert > Comment from the menu bar.
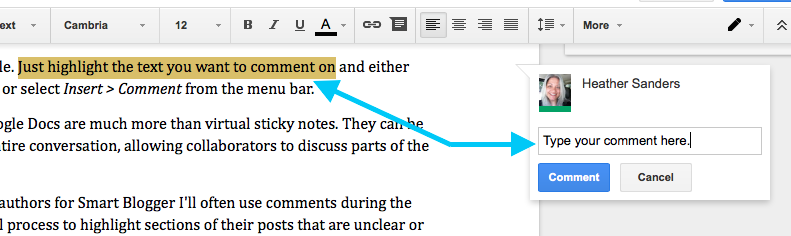
However, comments in Google Docs are much more than virtual sticky notes. They can be the starting point for an entire conversation, allowing collaborators to discuss parts of the document in context.
When working with guest authors for Smart Blogger, I’ll often use comments during the early stages of the editorial process to highlight sections of their posts that are unclear or need more examples.
These annotations allow the author to see exactly which part of their post I’m talking about and add their own comments or reply to mine with questions and clarifications.
Once a comment has outlived its usefulness, e.g. after you’ve address the issue it originally highlighted, you can click “Resolve” and it disappears from view (although it’s still available in your comment history).
Suggesting Changes to Content
When collaborating with someone — a writer, co-author or editor — you may want to make changes to the content they’ve written. It’s clearer (and displays better collaborative etiquette) for you not to make edits directly to their work but instead, make suggestions they can review and accept or reject.
This feature is particularly useful when a copy editor — who edits for grammar, accuracy, and consistency — reviews a post because it allows them to highlight possible issues within the text.
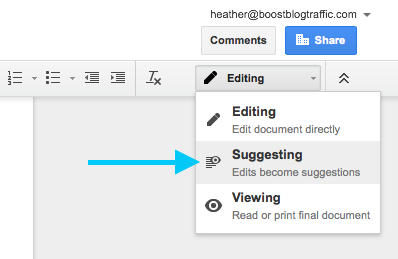
To do this you must switch from Editing mode (where changes happen directly in the document) to Suggesting mode:
You can do this by clicking on the “Editing” menu at the top right of the horizontal toolbar and selecting “Suggesting” from the drop-down menu:
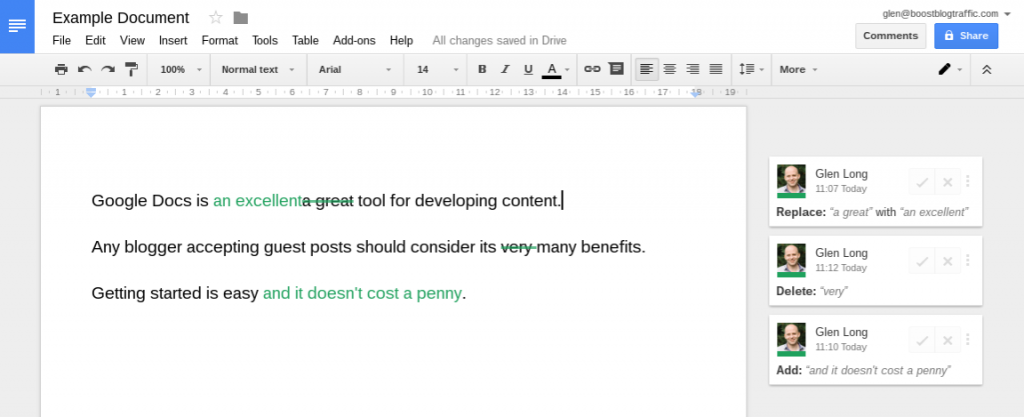
Once you’ve switched to Suggesting mode, any changes are highlighted and shown alongside the original text. A note also appears in the right-hand margin describing the change and giving the option to accept (tick) or reject (cross) it.
Here’s an example:
In addition to accepting and rejecting collaborators’ suggestions, you can also add a comment to start a discussion around the suggested change.
A Simple Workflow for Managing Guest Posts on Your Blog
At Smart Blogger, we’ve been using Google Docs for developing guest posts (and many of our own posts) for over two years, and in that time we’ve developed a simple workflow that simplifies the process of working with external authors.
It’s a huge improvement from those frustrating early days spent wrestling with Microsoft Word documents!
Before we look at the precise workflow, it’ll help to understand our basic process for developing a guest post from start to finish.
Here’s an overview:
- The guest author writes their first draft based on an agreed topic or headline.
- The blog editor or owner provides feedback on the draft to the author for their next draft.
- The author makes revisions (repeating stages 2 and 3 for several drafts until the post requires no further changes from the author).
- The copy editor makes any corrections/suggestions to the draft.
- The final draft gets formatted into WordPress and published.
It’s straightforward enough in an overview, but we’ve found the process can go awry without an agreed workflow to keep things running smoothly.
So here’s how it works…
Step 1: Create a New Folder in Google Drive
As soon as we’re ready for a guest author to start working on a post, we create a new folder for it in our company’s Google Drive.
Here’s the basic folder structure we use for all our guest posts at Smart Blogger:
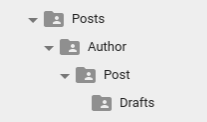
The roles of the individual folders are as follows:
- Posts – the parent folder containing all of our blog posts
- Author – contains all of the posts by a single author
- Posts – contains all of the files relating to a particular post by that author
- Draft – contains snapshots of all the drafts for the post
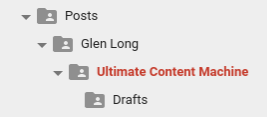
Here’s a specific example — the folder structure for the post you’re reading right now.
Once we create the folder structure, we populate the post folder (in this case “Google Docs Workflow”) with new copies of a handful of simple templates we reuse for each new post.
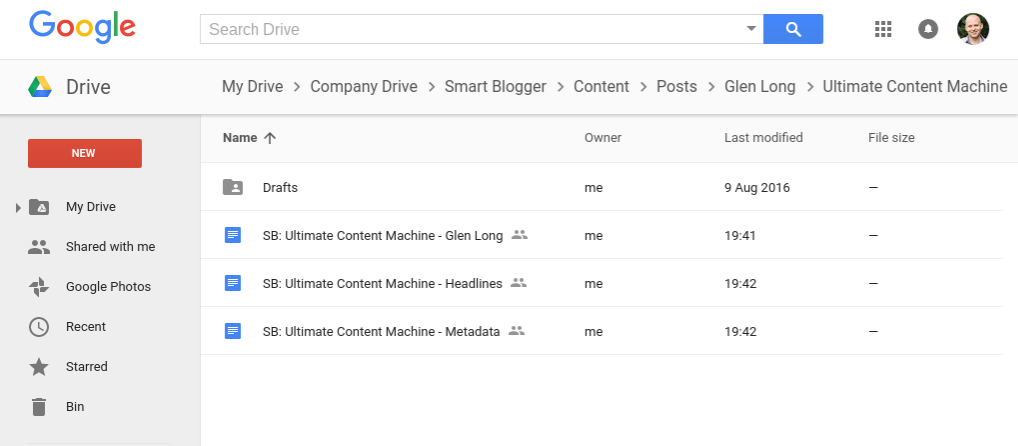
The first document is a blank blog post template where the author will work on their post.
In addition, there are a couple of other files we create — one for a list of possible headlines (You know how we love tweaking our headlines!), and another with post metadata — such as the proposed slug and meta description, which is completed before publication.
Here’s what the blog post template looks like before the author starts working:
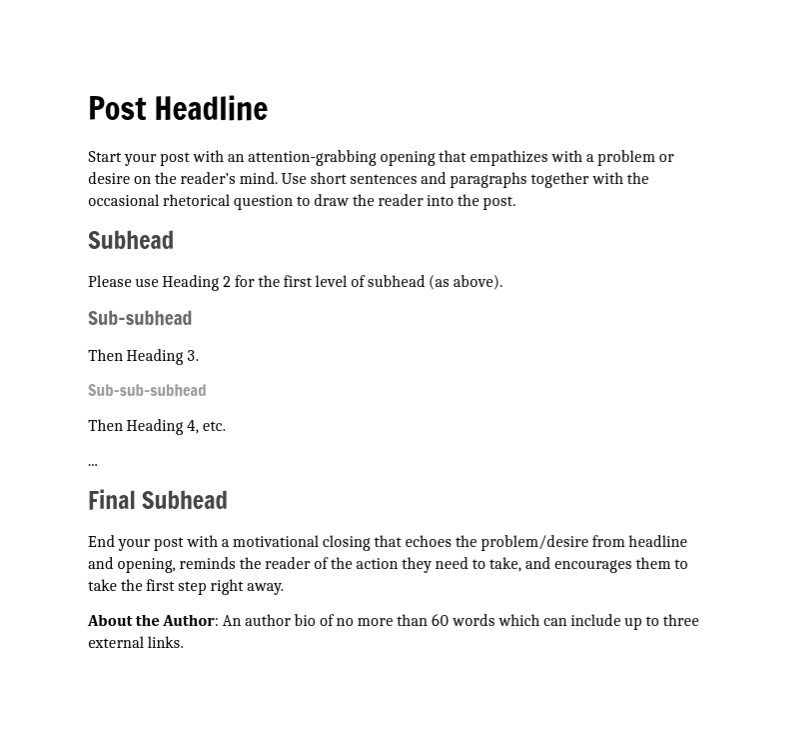
If you want to use our template, you can grab a copy here (click File > Make a copy while logged into your Google account).
Step 2: Share the Template with the Post’s Author
Once we set up the folder structure, it’s time to share the post template with the author, exactly as we discussed above.
We grant them “Can edit” permissions so they can add their content and usually include a short note that gets sent with the sharing notification:
Step 3: Create a Copy of Each Incoming Draft
While the author is working on the post, we tend to leave them to it — they’d probably find it disconcerting having us watching over their shoulders as they write!
But once an author tells us they’ve finished with the current draft — usually by email — the first thing we do is create a copy, add the label Draft 01 and drag it into the Drafts folder:

Google Docs are effectively snapshots of the content at that moment in time, minus any comments and revision history.
But why create them? Is it really necessary, particularly since Google Docs automatically maintains a complete record of the evolution of the document?
We find it useful because while Google Docs tracks changes, writers and editors tend to think in terms of individual drafts. So it can be helpful when we need to quickly review a snapshot of a post at a particular stage in its development.
For instance, a post doesn’t always develop in a straight line, and it’s valuable to give the author notes like “I feel this section worked better the way you wrote it in Draft #2.”
Step 4: Review the Current Draft and Add Comments
Once I’ve created a snapshot, I’ll review the latest draft and add detailed comments to help the author understand what I require for the next draft.
Next, I’ll drop them an email letting them know I’ve left comments for them to review.
Then, I’ll keep an eye out for notifications from Google of replies to my comments — those in-document conversations I mentioned earlier — and jump into the document to resolve any questions.
At that point, it’s time to wait for the author’s next draft — effectively looping back to Step 3, creating a new copy and so on.
Note that the file the author works on is always the same, which greatly reduces the potential for confusion. Before our Google Docs workflow, we’d typically exchange Microsoft Word files via email and after a few drafts, it was often difficult to be sure you were looking at the latest draft.
Step 5: Submit the Draft for Copy Editing
Once the draft has reached the point where the author has addressed all my comments and suggestions, and is close to being ready for publication, it moves into a new phase – making any final pre-publication edits.
Sometimes I’ll make some minor edits to make sure the post meets our house style and tone – I’ll create a new copy of the draft labeled “Final Edit” and work on it there.
Once happy, I’ll change the label to “Copy Edit” and pass it over to our copy editor who’ll make any changes in Suggesting mode before handing it back to me.
Once I’ve reviewed and accepted (or rejected) any copy changes, the Google Doc is finally ready to be copied and formatted into WordPress.
At this stage, I change the label to “FINAL” so that it’s completely clear that the post has reached the end of its development.
Step 6: Format the Post in WordPress
The final step is to copy the content across into WordPress and format it. It’s fairly straightforward but does requires a couple of manual steps, specifically:
- Any embedded images must be uploaded to WordPress separately and manually added to the document.
- A small amount of HTML clean-up is required, but it’s only a minute or two’s work with a text editor.
Admittedly, it’d be nice if these steps weren’t required. They’re a byproduct of pasting directly from Google Docs to WordPress. A small niggle in an otherwise fairly elegant process.
However, depending on your exact formatting requirements and the number of posts you publish in a typical month, it could make sense to look into a tool like Postable, which automates this part of the process for you.
But let’s assume you’re doing this part by hand. Here are the steps for moving your post across.
1) Copy and paste your entire post into the WordPress Visual editor.
Using Visual mode (instead of Text mode) all of the important formatting will be preserved — text styles, heading levels, bullets, etc.
As mentioned before, images will not come across when pasting. You’ll need to handle those separately.
2) Switch to Text mode and remove any unwanted HTML markup.
When switching to Text mode within the WordPress editor, you’ll see your formatted post in its “naked” HTML form.
The code created by this process is pretty clean — particularly if you use our Smart Blogger template above — but there are still a few recurring “artifacts” that you’ll need to fix by hand.
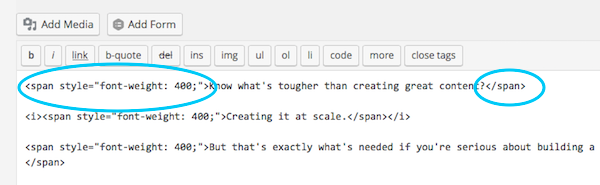
Fortunately, they all follow a predictable pattern so performing a global search and replace in your favorite text editor will quickly do the trick.
Here’s what you’ll need to do:
- Replace all occurrences of <li style=”font-weight: 400;”> with <li>
- Remove all occurrences of <span style=”font-weight: 400;”> (replace with empty string)
- Remove all occurrences of </span> (replace with empty string)
The exact text you need to replace may be different with a different starting template, but it should still amount to removing opening and closing span tags and styling from any other tags.
Copy and paste the code into the text editor, make the changes, then copy and paste it back into the WordPress editor (Text mode).
3) Upload any images to the Media Library and add them to the post.
It’s up to you how you handle images. We like our authors to embed them in the Google Doc because that makes the post easier to review and keeps all the content in one place.
If you do it the same way, there’s a neat little trick you can use to grab all the images within the document.
If you select File > Download as > Web page (.html, zipped) from within your Google Doc, you’ll get a zip file.
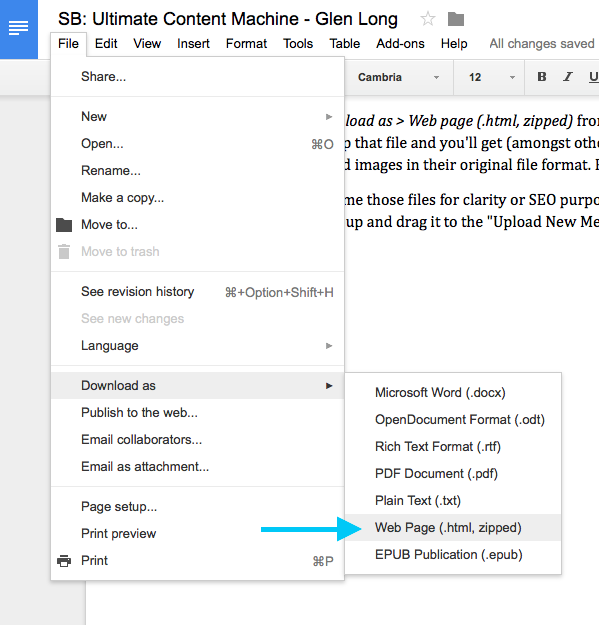
Unzip that file and you’ll get (amongst other things) an “images” folder with all of the embedded images in their original file format. Yay!
You may choose to rename the image files for clarity or SEO purposes, but once done, you can select the whole group and drag it to the “Upload New Media” page within WordPress.
Then it’s simply a case of adding the images to the body of your post as you normally would.
Turn Your Blog into a Content Machine with Google Docs
There’s no doubt — content is the fuel that drives your blog’s growth.
But as important as it is, smart bloggers know when it’s time to outsource.
Because the sad truth is, if you spend all your time creating content, your blog will never reach its full potential.
That’s why you need a process that will scale as your blog grows, and you begin working with talented guest writers.
You need a simple system that’ll enable you to publish more quality content while spending less time doing it.
Combine Google Docs with a simple editorial workflow and you can create a powerful content machine that will propel your blog into the stratosphere.
(And even if you’re not ready yet, you’ll still benefit from making Google Docs your go-to content development tool.)
So what are you waiting for?
Let’s add some fuel to that fire.
from
http://redirect.viglink.com?u=https%3A%2F%2Fsmartblogger.com%2Fcontent-machine%2F&key=ddaed8f51db7bb1330a6f6de768a69b8
No comments:
Post a Comment