
You want your website’s visitors to have the best experience possible, right?
Well, then you better not keep them waiting. Slow-loading pages are one of the biggest frustrations people experience online.
In fact, having slow page loads can affect everything from how many people view your site and where you rank in Google to how likely people are to buy from you.
In other words, having a fast website is crazy-important.
But what can you do? You’re not a developer, so you don’t have the first clue how to speed up your site.
That’s where WP Super Cache comes in.
It’s a free plugin that can slash your page load times in half without the need for any special knowledge.
Here’s how it works…
How WP Super Cache Makes Your Website Faster
Before I explain how WP Super Cache works, you need to understand how WordPress serves your content to your visitors.
This will get a bit technical, but don’t worry, I’ll try to keep this as painless and human-friendly as possible. I know most of you aren’t developers. (And neither am I!)
Here’s what goes on under the hood of your site:
Whenever you get a visitor, WordPress builds the page through a number of processes which involve:
- Executing PHP (like the functionalities added by your theme or your WordPress plugins)
- Querying your site’s database to retrieve content (like the text in your blog posts)
Normally, WordPress executes these processes dynamically.
That means WordPress has to execute all separate processes to load your website’s content for each individual visit.
Now computers are fast these days, but this still takes time.
And your visitors can’t see your website until these processes are complete, which means they have to wait to start using your site (a.k.a. slow page load times ).
That’s exactly the problem WP Super Cache fixes.
WP Super Cache Turns Dynamic into Static to Speed Up Your Site
Using something called page caching, WP Super Cache stores a static HTML copy of your content for visitors to browse. Basically, it stores a copy of the end result of the dynamic process outlined above.
That way, your web server no longer needs to execute the PHP or query your database for each individual visitor.
Instead, it serves up the already-finished product.
And because your server has to do significantly less work, it loads the finished page much faster.
Here, I’ll prove it…
Putting WP Super Cache to the Test with Real Data
For this tutorial, I’ll set up a test site and upload a full landing page so it seems “real.”
Then I’ll use Pingdom’s Speed Test tool to show how quickly my site loads before WP Super Cache is installed, and how quickly it loads after various steps in the configuration process. (I recommend you do the same when you install the plugin.)
That way, you’ll see exactly how much of an effect WP Super Cache has.
Ready?
Here’s the page load time before installing WP Super Cache:
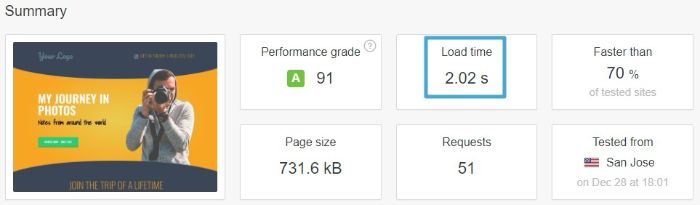
2.02 seconds isn’t horrible, but we can do a lot better!
Let’s install WP Super Cache and see how fast we can get.
Step #1: Install the WP Super Cache Plugin
WP Super Cache is listed in the official WordPress.org plugin directory, which means that you can install it straight from your WordPress dashboard.
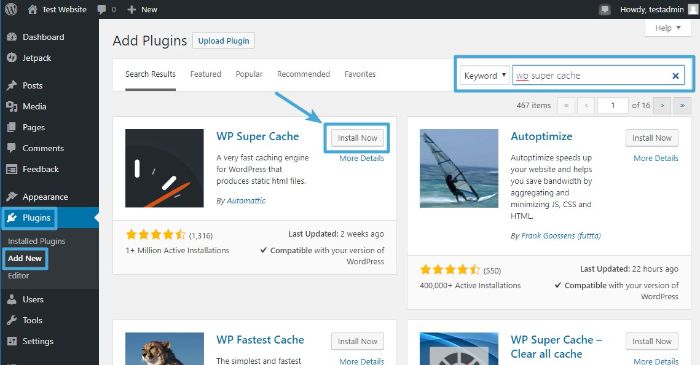
To do that, go to Plugins → Add New. Then search for “WP Super Cache” and click the Install Now button:
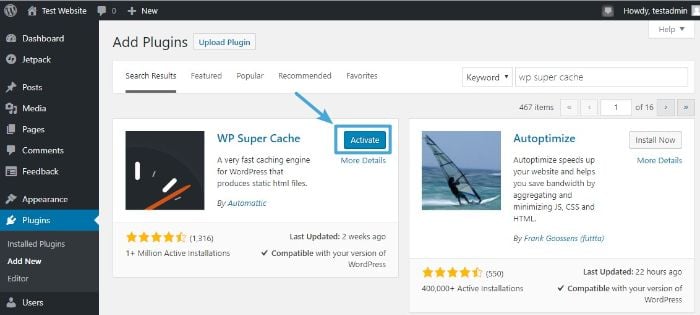
After a few seconds, the Install Now button should change to read Activate. Click that Activate button to make WP Super Cache active:
Now the plugin is active on your site. But it’s still not working quite just yet.
Here’s what to do next…
Step #2: Turn On Basic Caching for an Instant 50% Reduction in Page Load Times
One of the beautiful things about WP Super Cache is how easy it is to start using the plugin. All you need to do is click a button.
Yes, really.
You can configure some of the advanced settings to optimize your load times further (which we’ll cover in a minute), but clicking that one button gives you the biggest speed boost.
Here’s what you do:
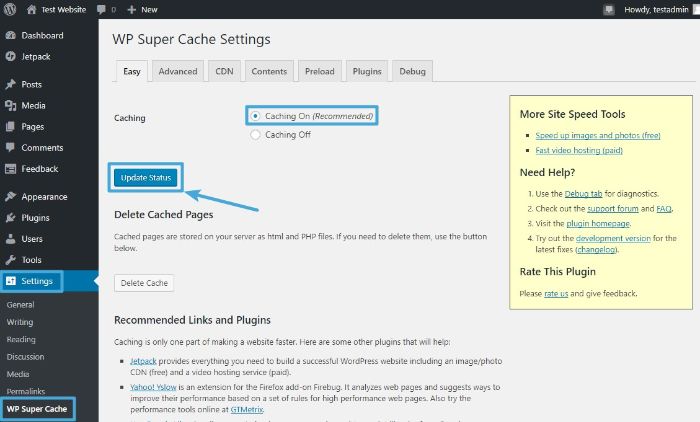
Go to Settings → WP Super Cache in your WordPress dashboard.
Then select the radio box for Caching On and click Update Status:
And just like that, you’ve activated basic page caching on your site. By itself, that should lead to a major speed improvement.
How major? Let’s find out!
Here’s my page load time after clicking the button:
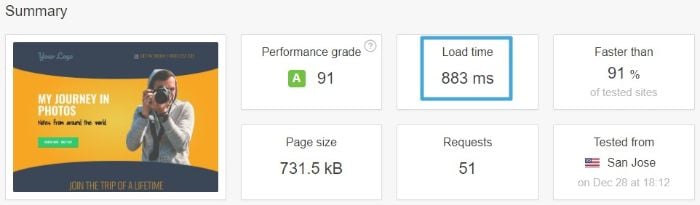
Now, my test site loads in just 883 milliseconds. (Remember, it was 2.02 seconds before.)
Let me press a few buttons on my calculator, and…
Yup, I cut more than half off my page load time with less than five minutes of work.
Amazing, right?
But we’re not stopping there.
Because WP Super Cache includes some advanced settings that can:
- Further speed up your site
- Prevent caching-related issues
So let’s soldier on and configure some of these settings.
Step #3: Configure Advanced Settings for an Even Bigger Speed Boost
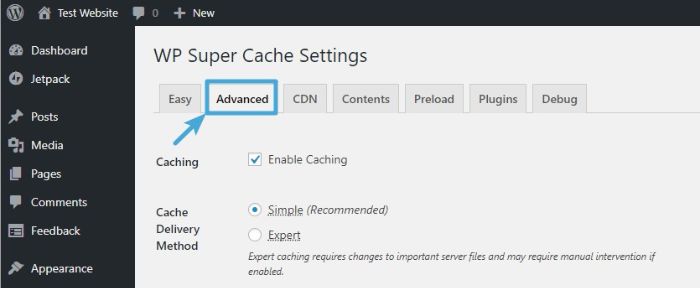
To get started, head to the Advanced tab in the WP Super Cache Settings area:
To configure most of the advanced settings, you pretty much just need to check a box.
Below, I’ll explain each box that I recommend you check, starting in the Miscellaneous section.
1.) Exclude Admin Accounts and Other Users from Caching
This way, WordPress will still dynamically generate pages for people who are logged in.
One issue that arises from caching is that it takes around 30 minutes for changes you make to your site to go live. That means you’d have to wait 30 minutes before you can see the result of your changes. Obviously, this would be a pain.
That’s why you should check the box for Don’t cache pages for known users and keep that from happening:
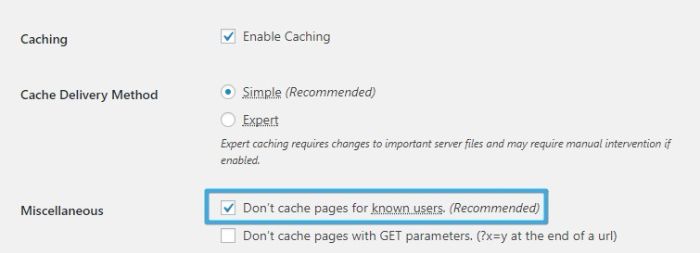
This way, WordPress will keep generating pages dynamically for logged-in users (i.e., you, the administrator).
You’ll always get the latest dynamically-generated version of your site, while anonymous users get the performance-optimized static version.
2.) Enable GZIP Compression for Another Small Speed Boost
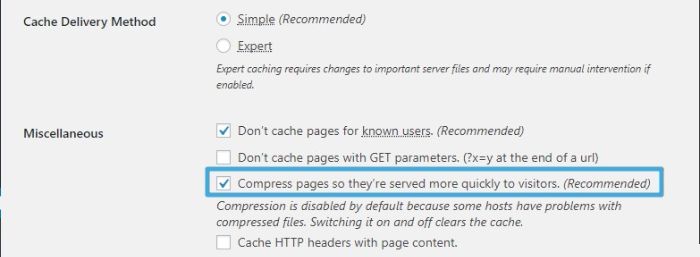
Next, you should check the box to Compress pages so they’re served more quickly to visitors.
Here’s what that does:
WP Super Cache will shrink (compress) the size of the static file that it generates without affecting the file’s functionality. Because the file size is smaller, your page will load a little bit faster:
How much quicker? After enabling this setting, my page load time shrunk a little more, down to 837 milliseconds:
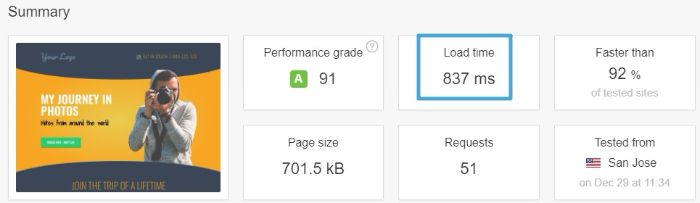
It’s definitely not as big a reduction as before. But when it comes to page load times, every bit counts!
If you encounter any issues, you can just uncheck the box. While you’re missing out on a small speed boost, the difference is relatively negligible.
3.) Enable Browser Caching to Eliminate Redundant Downloads
So far, you’ve enabled WP Super Cache for page caching, but you should enable the plugin for browser caching as well. This can boost load times even further for recurring visitors.
Here’s how it works:
Browsers temporarily store files on each visitor’s computer. By enabling browser caching, you tell your visitor’s browser not to reload parts of your page that haven’t changed from their last visit. Instead, their browser will load the file from their computer, which is much faster than downloading it from your host server.
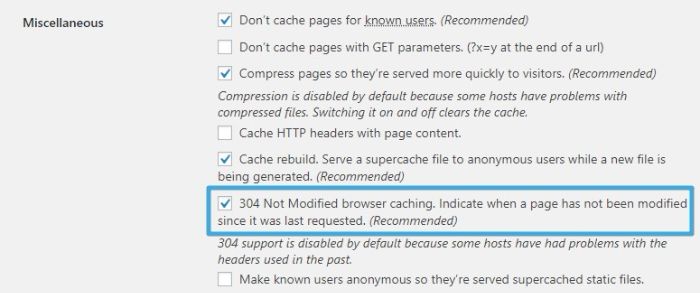
To enable this setting, check the box for 304 Not Modified browser caching:
Unfortunately, because Pingdom doesn’t store files the same way regular people’s computers do, I can’t show you how much this boosts performance.
4.) Exclude Pages from Caching (If They Experience Issues)
Caching is unlikely to cause issues with 99% of your site. But it can happen, especially on any pages where you ask visitors to enter information in a form.
For example, I’ve personally had an issue where the contact form on my portfolio site wasn’t working due to my caching plugin. Yikes!
This can directly lead to lost business, which is why you should test important pages on your site as an anonymous user after installation. (Remember, you just enabled the setting to exclude your WordPress account from seeing cached pages.)
How?
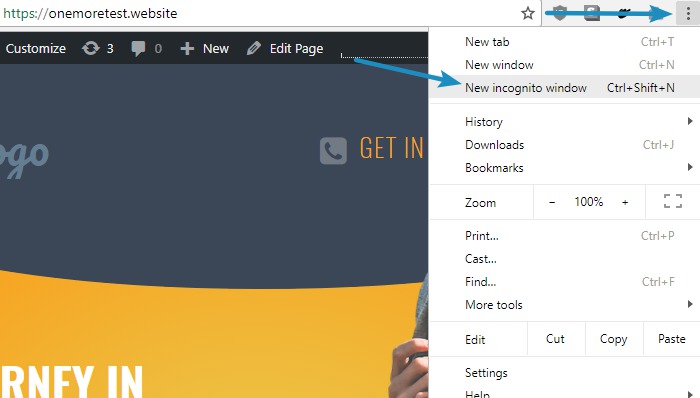
Depending on your browser, open up a new window in Incognito mode (Shift + Ctrl + N in Chrome or Opera) or Private Browsing mode (Shift + Ctrl + P in Firefox or Internet Explorer) and test the page that way:
If you notice anything funky, you can manually exclude that page from being cached to avoid any issues.
Just scroll down the Advanced Settings page until you reach Accepted Filenames & Rejected URIs.
In the section that starts with “Add here strings (not a filename)”, enter the URL slug for the page that’s having issues.
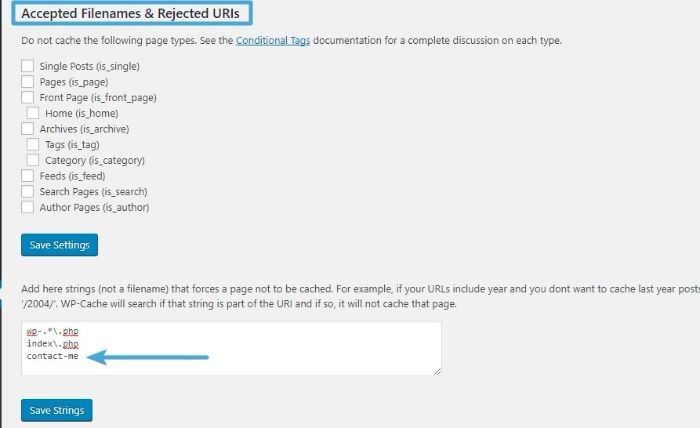
In the example above, you can see that I’ve manually excluded my Contact Me page.
Not sure where to find the URL slug? Just go to the page with issues and copy the part that comes after the slash:

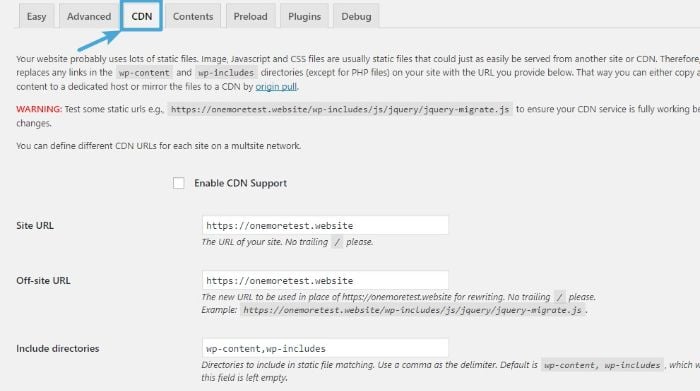
5.) Consider Using a CDN to Speed Things Up Even More
You might not know this, but physical distance still has an effect on how quickly a website loads. (Curse you, laws of physics!)
So the farther away your visitor is from your host server, the slower your site will load — unless you use a CDN (a.k.a. Content Delivery Network).
When you use a CDN, you distribute copies of your site’s static files (like your images) to different servers around the world.
That way, your visitors can download these files from a location that’s close to them, instead of downloading them from your host server.
And WP Super Cache offers an option to install a CDN on the CDN tab:
But here’s the thing…
I recommend not using WP Super Cache for this, and using Cloudflare instead.
Cloudflare is a CDN that:
- Is easy to get started with
- Offers a free plan
- Includes security features to keep your site safe
But you can’t use WP Super Cache to install Cloudflare. You install it by changing your nameservers. (Here’s a tutorial to get you started.)
So how much does a CDN like Cloudflare speed up your site, anyway? Once again, let’s see the data:
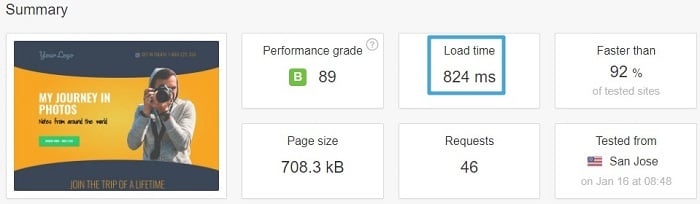
You can see that my site now loads in 824 milliseconds, which is another small improvement from the previous speed of 837 milliseconds.
Now, that may not seem like much, but remember that the CDN’s purpose is to make your website fast for people around the globe.
So even though you only see a small speed improvement here, the improvement will likely be far greater for people visiting from Europe, Asia, or Australia.
How to Manually Clear Your Cache (And Why This Is Important)
Almost finished!
There’s just one more thing I want to cover.
As I talked about earlier, caching can delay changes made to your site. But sometimes you’ll make a change to your site that you want to go live right away for all users.
You do this by manually clearing your cache.
This forces WP Super Cache to generate a new cache that incorporates your most recent changes.
Here’s how to do it:
Go to Settings → WP Super Cache. Then click on the Contents tab and choose Delete Cache.
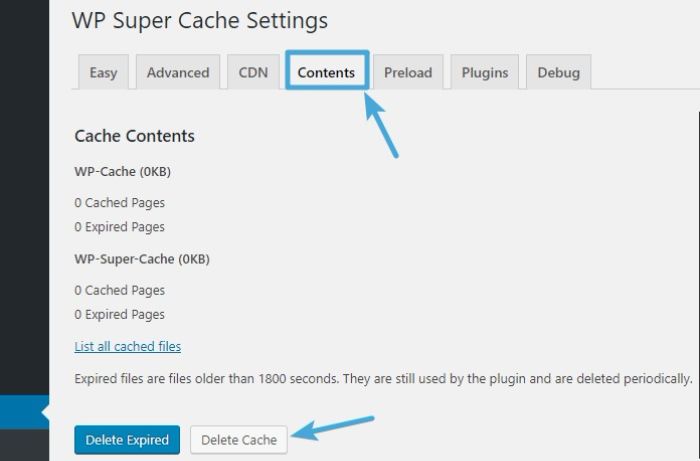
And that’s all there is to it!
Delight Your Readers with a Quick-Loading Website
Going forward, you’ll never need to worry whether your visitors are yelling at their computer screens, waiting for your website to load.
Now you have the knowledge you need to ensure your website loads as quickly as it can, for everyone.
All that’s left to do is to put your knowledge into action.
Install the WP Super Cache plugin, click that button, and configure the advanced settings.
You’ll have a faster-loading website before you can finish a cup of coffee.
from
https://smartblogger.com/wp-super-cache/
No comments:
Post a Comment