Step-by-step guide for creating a free webinar. Updated for 2020.
It’s just too scary, isn’t it?
You see all those fancy schmantzy bloggers offering webinars.
And everyone and their cat is queuing up to watch them.
They have the authority; they get the attention.
Yes, I bet it’s crossed your mind to do it too.
After all, webinars are supposed to be the hottest thing on the Net.
But to run a webinar yourself? It’s just too damn scary.
There’s the huge cost. And how do even start creating a webinar, let alone broadcast it?
It’s beyond the reach of a blogger like you, right?
I’m here to tell you something: the world of webinars has changed.
It’s now affordable. It’s easy. You can do it.
In fact, you should do it.
Here’s why…
Why Serious Bloggers Love Webinars (Even if They Don’t Have Anything to Sell)
If you start blogging about any topic that more than a handful of people care about, you’ll be up against fierce competition.
Many bloggers will be fighting for the attention of your audience, and from the outside looking in, little will distinguish you from them.

So if you want to rise above the mass of wannabe bloggers, running webinars is a savvy option. Here are the benefits:
- You transform your ideas into events. As the experienced blogger Chris Garrett says: You get the opportunity to create a sense of event around your ideas, value and information.
- You forge a unique bond with your readers. Watching you on live camera is the next best thing to seeing you in person. Not only can they see you, but they can also interact with you. And in the future when they read your content, they’ll hear your voice.
- You become an authority. When you appear as a presenter and give value to your readers, you create fans who respect you as an authority.
- You increase your blog traffic. Online events, like webinars, are like magnets. They attract traffic and generate new subscriptions.
- You can make money blogging. If you review, promote, or talk about a product as an affiliate in a webinar, you can make sales and earn income.
But if webinars are so damn sexy, why don’t more bloggers use them?
The honest truth?
Because they’re scared.
Why Most Bloggers Are Scared Witless by Webinars
Let’s face it.
Running a webinar sounds daunting.
The technology seems like a scary challenge.
And then there are those embarrassing glitches you hear about…
Like the guy who talked for thirty minutes before noticing that people could hear zilch.
Or the trolls who stalk webinars and disrupt presentations.
Sh*t happens, but most problems are avoidable.
Bottom line: you have to practice before you go live.
Unfortunately, I headed into my first webinar ever with the attitude, “I haven’t got time to practice, but, hey, it can’t be so difficult!”
The webinar ended in chaos. Here’s what went down…
It was in 2009. Leo Babauta and I had just created a blogger training course, called A-List Blogging, and we decided to run a webinar as part of our launch.
The software we used at the time allowed us to appear live on camera. It looked easy, so I didn’t bother to practice.
The plan was that I would start the webinar and Leo would appear after my introduction.
We agreed to meet up as presenters in the software’s “green room” a few minutes before kickoff.
But Leo was nowhere to be seen.
I waited a few minutes and then started the webinar without him.
I was rattled.
After a little while, I said to the participants:
“Er… sorry, folks, I seem to have mislaid Leo.”
“WHAT!?” The chat-box erupted with questions.
It wasn’t a good moment.
Suddenly, a few lines appeared in the chat box, written by Leo. He couldn’t get into the system as a presenter so he entered as a participant to let everyone know he was locked out.
I soldiered on.
Now and then, Leo popped up in the chat to say he was still trying to get in.
The participants got involved:
“Leo, REBOOT!”
“Mary, has Leo got the right password?”
“BUY A NEW LAPTOP, MAN!”
Leo never managed to show — and the webinar slowly slid into chaos.
And when I think about it today, I still feel a little sick.
Since that time, I’ve learned how to create webinars that are goof-proof.
And I’ll tell you exactly what you need to know to run successful online events.
But first, let’s consider what content to choose for a webinar.
How to Choose a Webinar Topic Your Readers Can’t Resist
Most people are busy, and leisure time is in short supply. So if your webinar topic is boring as bat’s piss, they’ll chill out with funny cat videos on YouTube instead.
To get your readers to watch, you must wow them with a topic that’s as satisfying as placing the final piece in a puzzle.
But how to pick the right topic?
Hidden in your blog are two sources of fail-safe webinar topics: your list of popular posts, and the list of keywords that lead readers to your site.

Take a look at your ten most popular posts and think about repurposing them as a webinar.
For example, on my blog WritetoDone.com, three of the ten most popular posts are hot contenders for webinars:
- How to Write Better: 7 Instant Fixes
- 201 Ways to Arouse Your Creativity
- How to Finish What You Start: A Five-Step Plan for Writers
I’m sure you can imagine how these topics would lend themselves as content for a webinar. In fact, 201 Ways to Arouse your Creativity could be transformed into a whole series of webinars!
A webinar is an opportunity to drill down into the topic of a popular post. It’s your chance to expand what you wrote, give detailed suggestions, offer examples, and discuss questions.
The second source of content for success-prone webinars are the keywords people use to find your blog. If you have Jetpack installed, you can find them in the Site Stats section, or you can look in Google Analytics (under Acquisition > Keywords > Organic).
For example, the following keywords brought readers to Write to Done on a recent day:
- Things to write about
- Sexs (yes, written like that!)
- Writing dialogue
- How to write better
- How to be a writer
…and the list goes on and on.
Apart from the second keyword [YIKES], all the others would be great starting points for creating webinar content.
But what about your blog?
What keywords do people type in to find you?
Once you’ve picked your topic, you’ll be itching to create content right away.
However, I suggest holding off until you get a tight grip on the technical aspects of running a webinar. Creating content is much easier once you understand your webinar basics.
How to Host a Webinar Like a Pro (Without Spending a Dime)
Thanks to Google Meet, it’s possible to run webinars for free. And you can accommodate up to 100 participants!
(Zoom is another free webinar option. With a personal Zoom account, you can host a meeting with up to 100 participants for up to 40 minutes.)
If you reach the point where you need to scale up your webinars, you can simply upgrade your Google Meet account. With G Suite Essentials (affiliate link), you’d have access to additional features for $10 per month. Alternatively, paid Zoom plans start at $14.95 per month.

So how do you get started with Google Meet? Simple. Just log into your Google account.
(Don’t have one? You can create one here.)
If you already have a Google account, log into your Gmail.
If you’re a G Suite user, log into your G Suite account.
Simple, right?
Now it’s time to get cozy with running a webinar. And there’s only one way to get confident: practice!
How to Do a Webinar (Without a Hitch)
- Get to Grips with Google Meet
- Practice With a Friend
- Learn How to Schedule a Video Meeting
- Create a Test Webinar
1. Get to Grips with Google Meet
If you used Google Hangouts, the learning curve for Google Meet won’t be very steep.
Here’s all you have to do to start a video meeting:
- Go to your Gmail;
- In the sidebar, click Start a meeting;
- In the Meet window, choose Join now.
That’s all there is to it. Here’s a helpful video to make it even easier:
If you watched until the end of the video, you saw how easy it was to invite guests to your meeting.
This segues nicely into our next step:
2. Practice With a Friend
You can only test so much in a video meeting when you’re the only attendee. So, let’s invite a friend or two.
Go back into Gmail, click Start a meeting in the sidebar, and choose Join now.
In the new window, a pop-up will appear that gives you the option to invite guests:
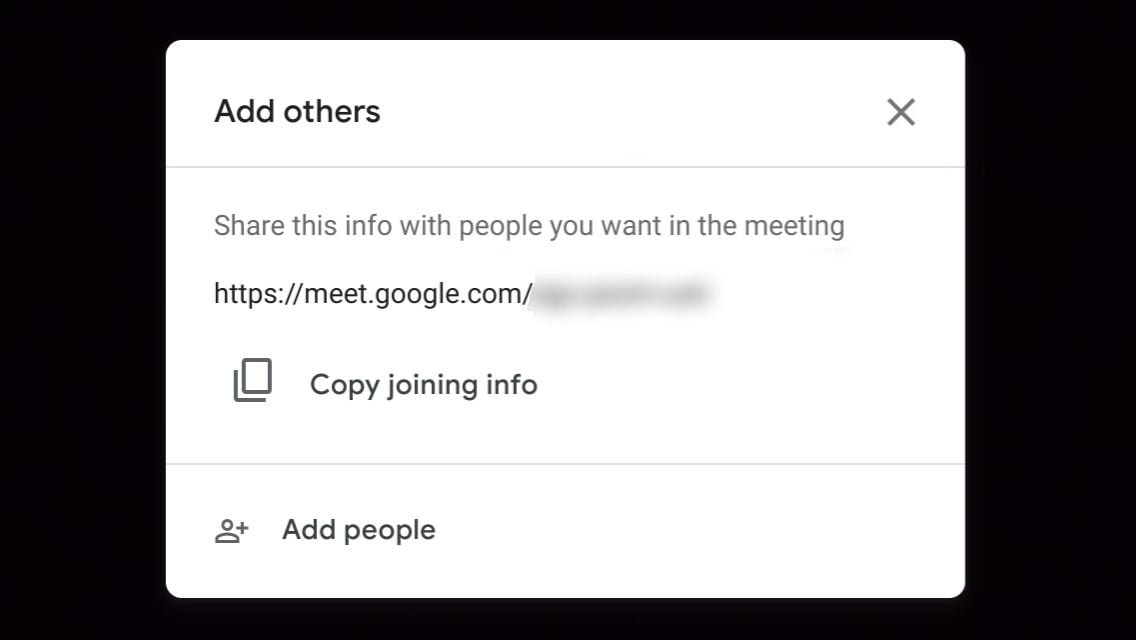
Click Add people and you’ll be able to invite friends to your Google Meet. Enter their email addresses (one friend to help you test is good, but two is better) and click Send email.
Once your friends have joined, test everything.
Can they hear you?
When you share your screen, can they see it?
This is the time for you to test and troubleshoot everything. If something’s wrong, you want to find out now — not when you have a hundred impatient guests.
3. Learn How to Schedule a Video Meeting
Next, we need to practice scheduling a webinar in advance. After all, you’re not going to set everything up minutes before you go live (right?). So, let’s go over how to schedule one.
First, go to calendar.google.com. (You could also click the calendar icon inside Gmail.)
Next, you can click the “Create” icon or the date on the calendar you’d like to hold your webinar.
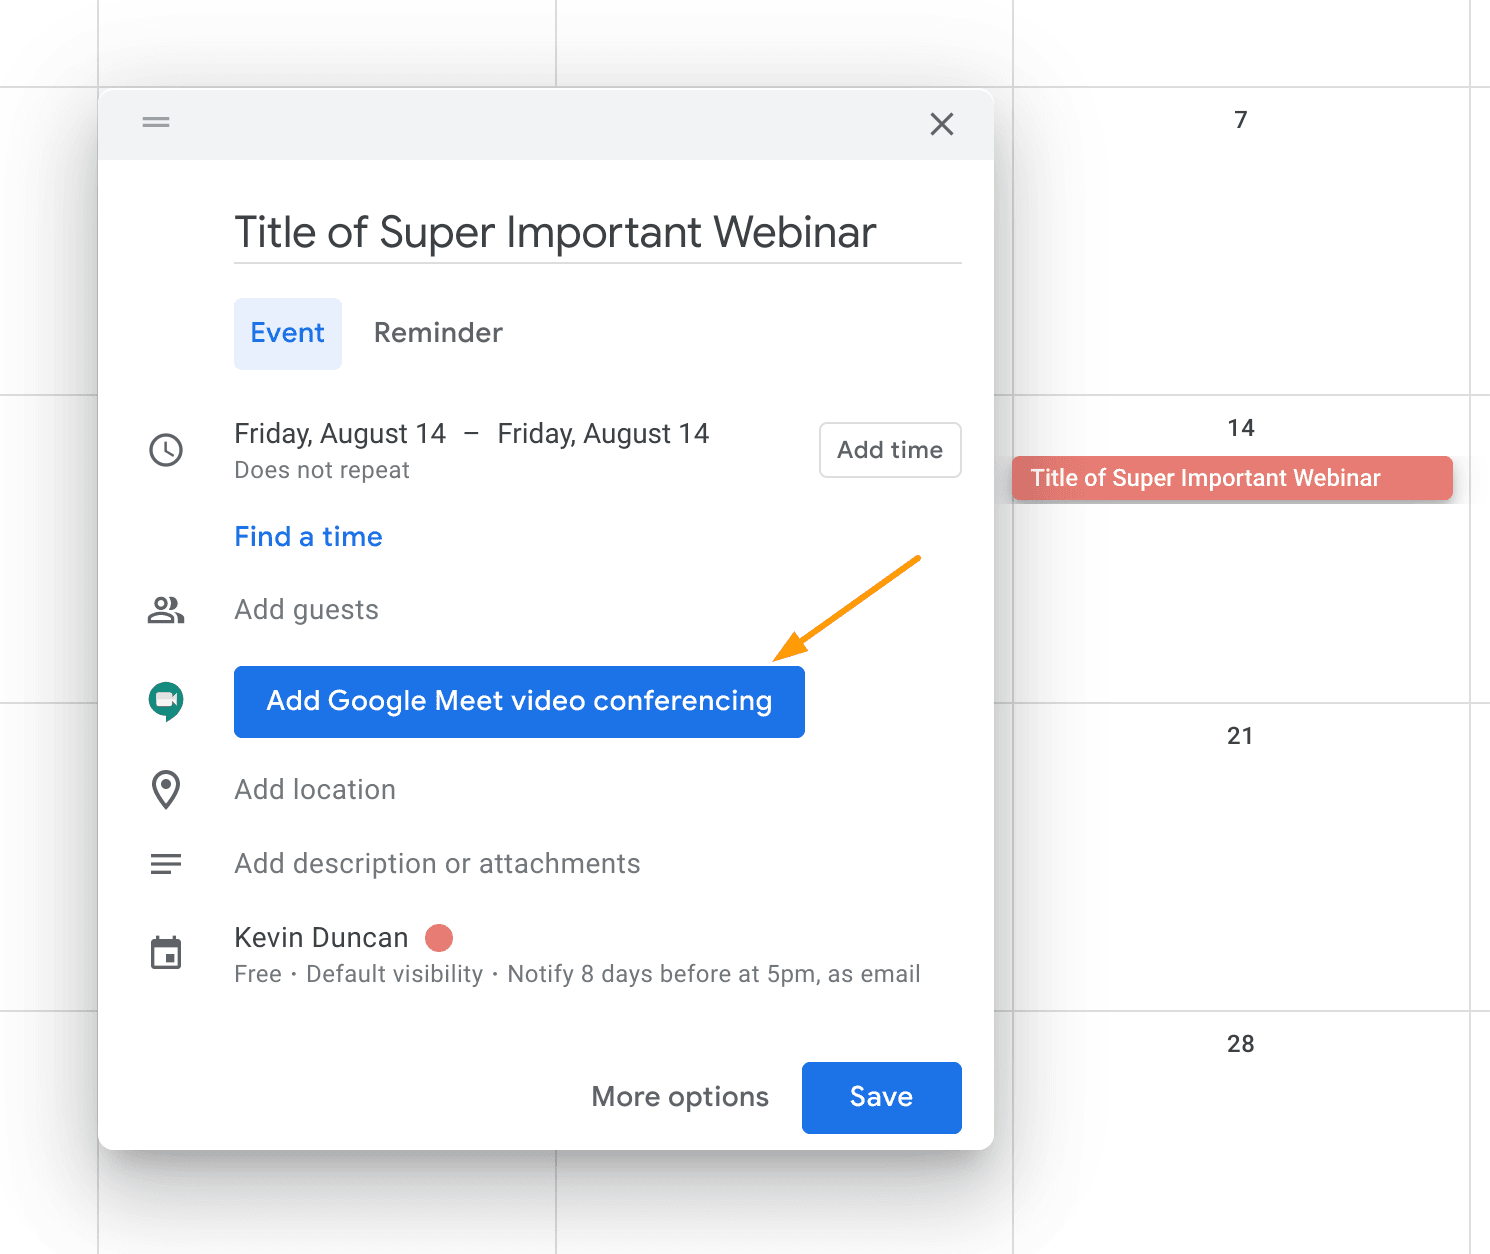
In the window that appears, you can enter the title of your event, the time and date, invite guests, and more.
But most importantly for our purposes, there’s a “Add Google Meeting video conferencing” button. Be sure to click it before clicking Save.
Once you click Send, your guests will be notified.
Here’s a video that goes into a bit more detail:
Now it’s time to put everything together.
4. Create a Test Webinar
Let’s integrate what you’ve practiced so far:
- Create an event in Google Calendar;
- Name the event and schedule it sometime in the near future (30 minutes is fine);
- Add 2 or more guests to the event and click Save.
Once the time of your event arrives, join the meeting and thoroughly test everything again.
Did your guests arrive? Can they hear you? Can they see your screen?
And so on.
Now that you’ve come to grips with the technical side of webinars, let’s get creative and give shape to your content.
How to Design a Webinar to Engage Your Audience from Beginning to End
For killer webinars, the classic three-act structure works best.
The first act is the introduction which includes your story of why you’re passionate about the topic. The second act is the main presentation, and the third act is the question and answer session.
Here is my blueprint for forty-minute webinars:
- 5 minutes for the introduction and personal story
- 25 minutes for the main presentation
- 10 minutes for the Q&A
A key part of your main presentation is the last five-minute stretch. Always end with a call to action. If your webinar is educational or inspirational, suggest one simple action your viewers can do today.
And make sure you know what’s in it for you too. Ask them to sign up for your email list or like your Facebook page.
If you’re using your webinar to sell a product, use the last five minutes before the Q&A to explain how the product solves a problem you’ve been talking about, and encourage people to buy it now.

Here’s the process of creating a webinar.
First, create a rough outline of the introduction and the main presentation with headings, subheadings, and bullet points.
Next, decide on an approximate length of each section so that you can work out how many slides you need — five slides per minute is about right.
In order to create slides, you need some presentation software. Depending on whether you have a PC or a Mac, you can use PowerPoint or Keynote to create slides.
Another option is to use the Google Slides app, which you can access on Google Drive for free.
When you create slides, use text only with big bold headlines.
Once you’ve created your slides, you can go back and add images for extra emphasis.
Of course, you’ll be speaking to your audience as you show each slide. You might be tempted to wing it, but write a script to follow. Believe me, you’ll feel more confident if you have the power words you want to say in front of you.
How to Make Sure the Camera Loves You (and Your Fans Will Too)
People love seeing their favorite bloggers live on camera because they feel connected in a way that’s difficult with writing alone.
But most of us don’t like how we look on camera. However, the truth is that talking, smiling, laughing — even making mistakes — on camera endears us to our readers.
You don’t need a “TV-face” to be successful, but you do need to know something about the psychology of relating to your viewers on video.
The key factor is camera placement. The camera needs to line up exactly with your eye-height.
Here’s why.
If the camera is below your eye height, attendees will get the feeling that you are “talking down” to them.
On the other hand, if the camera is above your eye height, attendees sense that you’re looking up to them and lack authority.
So line up the camera exactly with your eyes.

If you’re using a web-camera on your computer or laptop, you may have to balance it on a stack of books or adjust the height of your seat to achieve the right height.
One of the advantages of systems that use Google Meet is that you can choose between appearing live on camera and showing slide presentations. This also means you don’t have to be on camera every second of the webinar.
For example, you can start live on camera, then follow on with your slide presentation and appear live on camera again for the question and answer session.
So now that you’ve created your webinar, it’s time to let people know about it. After all, you want your fans to show up for your online event.
How to Create Irresistible Buzz for Your Webinar that Gets People Queuing Round the Block
You can create a great webinar. But what if nobody watches it?
The best way to create buzz around your event is to treat the lead-up like a mini-launch:
- Get participants to register for your event. It’s a good idea to set up a special email list with a corresponding signup form to use for registrations. You can do this easily if you’re using an autoresponder service like ConvertKit (affiliate link) or Mailchimp. You can create an automatic response that gives them the URL of the page where you’ll embed your webinar.
- Write a blog post that gets readers fired up about your webinar topic. You can heighten anticipation by opening up questions in your post and promising to answer them in the upcoming webinar. Place the webinar registration form at the bottom of your post and make a point of asking people to register.
- Email your subscriber list. Once you’ve announced the webinar on your blog, send out a series of emails reminding the people on your main list to register. In his ebook, The Ultimate Webinar Marketing Guide (affiliate link), Lewis Howes suggests sending out a sequence of three emails as a mini-launch. The first email could go out a week before the webinar, the second one four days prior, and the last one on the day before the webinar.
- Use social media to keep the buzz going. Don’t forget to use social media to let people know about the webinar. And reach out to other bloggers to let them know about the event too.

Another fantastic way to build buzz is to write a guest post on a popular blog covering a related topic and announce your webinar in the author byline. This takes some effort and planning but could have a huge impact on the number of attendees.
In general, you can expect about 25 percent of those who have registered to actually attend. To boost that number, send out an email just before you start the webinar to people who’ve registered.
It’s Time to Join the Ranks of the Webinar Pros
If you’re serious about becoming an authority; and want more traffic and subscribers, webinars are an opportunity you can no longer ignore.
You might think webinars are scary and costly, but thanks to free webinar tools like Google Meet and Zoom (plus a little practice) you can run slick, successful webinars at zero cost.
But the big question is: will you take action?
Because let’s face it, most people don’t; taking action requires grit.
So they stay hidden in the background, just another wannabe blogger who’s too meek to truly connect with their audience.
But that’s not you, right?
Because you’ll take the steps laid out in this post and put them into action.
You know this is your chance to finally rise above the mass of wannabe bloggers.
So grab it.
Use it.
Enjoy the attention and become a true authority!
Editor’s Note: This post has received significant updates since it was first published in 2014. As a result, some of the blog comments reference points that have been modified or removed.
The post How to Do a Webinar for Free (No Expensive Tools Required) appeared first on Smart Blogger.
from
https://smartblogger.com/your-first-webinar/
No comments:
Post a Comment